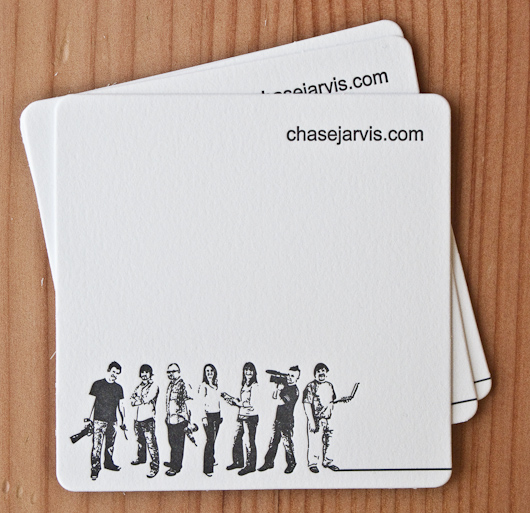
In full disclosure, I’m probably not the best person to pay attention to for stellar direct mail promo pieces. We did score a PDN Self-Promo award back in 2006 with this piece, but outside of that, I haven’t historically had a cohesive plan about this sort of stuff. And so it continues here today. But that’s not stopping me from wanting to share them. Actually, I’m proud to say that this is my second year in a row doing a holiday/new year mailer – I guess I’m on relative roll…which is what compelled me to roll out this latest Chase Jarvis SHORTS.
Postcards? Nope. Blurb book? Nope. 8×10 Glossy? Nope.
Coasters.
What the…who…huh? Coasters? Yep, coasters. They’re useful and different.
Again, I’m not necessarily advocating this to everyone as a means of marketing photography, especially seeing that this here item doesn’t show any real “work” – photographs or directors reel – but I thought it was interesting from an outside-the-box sort of an angle. And that counts for something. Plus, this being as much a unique gift as it is a promo piece, I felt good about sending it out.
Things I liked about the mailer: unique. useful. cool custom stamp. some personality. the packaging. atypical. the line art (our crew looks more like the Reservoir Dogs than a photo studio staff, and I dig it.)
Things I didn’t like: no actual work featured. cost (not cheap).
A closer look at the finished product, a step by step process of how we created these little suckers, and a call to action after the jump. Click ‘continue reading’ below.
—
Step by step, how we made these things:
1. Shot group portraits on white backdrop. Since there was 7 of us, we shot in two groups.
2. Composited the group together in Photoshop.
3. Used the stamp filter and threshold adjustment to reduce the image to its basics.
4. Exported a .psd to Illustrator.
5. Using live trace, converted to vector art.
6. Saved Illustrator file according to specs our printer provided.
7. FTP’d file to printer. (We used Girlie Press here in Seattle.)
8. The printer created a die for our agreed graphic.
9. They sent us a sample, run through the actual letter press on paper stock we’d already selected.
10. We approved the sample and then they went to town and printed a couple thousand.
11. We ordered stamps featuring an image of mine at stamps.com.
12. We ordered boxes and red sticker dots from uline.com
13. We ordered tissue from Paperzone.com
14. We ordered Avery labels from OfficeMax.com
15. We assembled them ourselves over a couple bottles of cheap red wine.
16. We mailed them out with glee.
Here’s a jpg closeup of the coaster.

We had a great time with it and feedback has been great.
If anyone feels like posting links to other creative promos–yours or someone else’s–I just might track you down and mail you some coasters… Love to hear from any lurking ADs, CDs, ABs, or PEs, of course.
RSS and email subscribers can see the video here.


With the demands of new fangled flush plumbing, temperamental septic systems, as well
as tender bottoms, tissue paper that would hold up for doing
the wipe but dissolve quickly on disposal became critical.
Once you have considered the appropriate size you are looking to use for your new camping toilet
you then need to consider the type or functionality that best suits
your needs. It’s surprising how some supposedly difficult problems have relatively easy remedies.
Plumbers are there to be used, so do not hesitate to give one a call if your toilet is overflowing, flushing
very slowly or not flushing at all. Having a noisy running toilet
is more than just an annoyance.