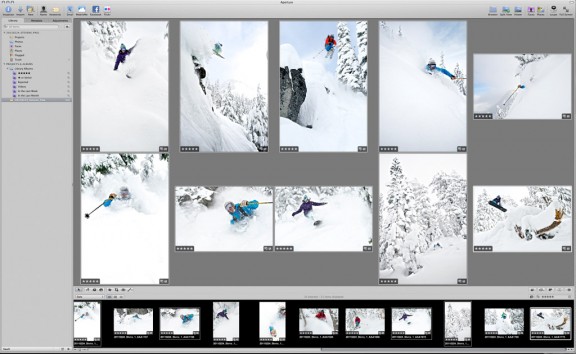
[Scott here with another guest blog post. Today I hope to save you some time and heartache by giving you the nuts and bolts of editing large volume shoots…]
Painful memories I have: My first breakup, my first deceased pet, my first time moving, but perhaps most painful of them all is this; my first attempt at editing 15,000 photos. Such overwhelming volume, such slow progress, so many similar photos. Why, oh why, did they ever create the motor drive!?
The pain from the breakups, pets and moves have only faded a bit, but the pain of volume editing is almost entirely gone. Call me masochistic, but I think I actually like editing big shoots. On the surface the challenge is the same as it ever was, but years of photo editing for one of the heaviest trigger fingers in the industry have honed my skills. And like a young ninja student who feels the sting of every misstep but grows to be a master, almost untouchable, oblivious to pain, I have conquered the edit. You can too.
For some of you this will be old news. But I am sure there are many who are like I once was; new to fast cameras and professional editing software. Trying to figure out how to take an avalanche of data and come out the other end with “final selects”. If you’ve never done it, it seems easy until you try. If you’ve done it a lot, it probably is easy. But if you’re somewhere in the middle it just might feel overwhelming. Perhaps I can be of some assistance by giving you a few tricks I’ve learned along the way.
The foundation of my editing process is (drumroll)….Rating With Stars!!! I know, it’s not groundbreaking. Aperture has stars, Lightroom has stars, Bridge has stars, iPhoto has stars. Almost every photo software on the planet has stars. That’s the beauty. Simple, effective, universal. Aperture is my editing platform of choice (UPDATE: when Apple killed Aperture, we moved to Lightroom as our default professional editor – we have always been very happy with both platforms and now we’re running almost entirely on LR in the pro workspace….), but this applies across the board. There are 5 stars available. Let me tell you what I do with each of them, hopefully you’ll find some wisdom in the why of the 5* editing system.
1* – Pace: Full Speed. Main Criteria: Is it garbage? Before you even think about starting your first pass through your shoot, do yourself a favor: let the software build all of it’s previews and caches. I know it can be hard to wait for this process, you feel like you’re wasting time, but trust me, it’s worth the wait. Why? Because the first pass through your big shoot should fast. I mean FAST.
You’re not trying to pick the winners, you’re not even trying to pick the contenders. Here’s a metaphor for you. They let 20,000 people qualify for the Boston Marathon. All you have to do in this first pass is pick the people who definitely won’t finish. The guy in the Santa suit, the lady drinking beer, the dude with a broken leg. Give a star to any photo that might make the cut. Don’t look closely, just glance. Is it way out of focus? Is it way under or over exposed? Is the model yawning, blinking, or otherwise looking at their worst? No star for you. Is it a remotely decent picture? Then it goes on to the next round.
2* – Pace: Full Speed. Main Criteria: Does it look OK? Grab a drink of water, quick snack, and then right back up to full speed. Filter your images to show only the images with at least 1 star. Now you’re only looking at images that aren’t horrible, but there’s plenty of room between horrible and average. Volume editing is an elimination process. This is your last chance to pull out pictures you never want to see again.
If you’re looking at high-action motor-drive images, this is the time to pull out the stuff that’s obviously before or after the key frames. Remember, do not worry about picking the key frames here, just dump the ones that aren’t by leaving them at one star. If you’re looking at portraiture or lifestyle shots, you’re trying to get rid of all of the shots where the subject is looking kinda bad. Weird pose, funny face, etc. No more stars for these guys.
3* – Pace: Cruising. Main Criteria: Is it pretty nice? Filter again, just show 2* or greater. You’ve been through these images twice now, you’re starting to get a feel for how the shoot turned out. You’ve probably even started to sorta like some of the photos. It’s time for these photos to get the nod. This move from 2-3 stars is probably where I invest the largest amount of time. You’re still looking at a lot of pictures, and you want to be somewhat critical at this step. The 3* edit is the first one we’ll consider showing a client, and It’s where we draw the line between photos we don’t want to wade through and images that are all generally viable. Look briefly at every photo and ask yourself: Do I like this photo? If the answer is no, no more stars. If the answer is yes, it gets the 3 star rating.
4* – Pace: Calculated. Main Criteria: Is it nice when you look closely? Set your filter to show 3* or better. If you were sorting through people here, now is when you would be deciding who you would consider a good friend, and who you think is just a nice person. You would be happy to introduce your good friends to your clients or your peers, you’re confident that they will make a good impression. You’ve spent enough time with them and examined their traits closely enough to know that they are good solid folk. It’s the same way with 4* images. If you’re not sure about focus, take the time to zoom in at 100% and make sure it’s good. If you’re not sure about exposure, click over to your adjustments tab and knock the exposure slider around a bit, make sure you’ve got detail where you need it. You’re making a commitment to these images, they are the elite of this shoot. Choose them carefully.
5* – Pace: Slow and thoughtful. Main Criteria: Is it outstanding? These are the winners. They are perfect in every way. You want to blow them up and print them the size of a house. You want to put them on your website and in your portfolio. They don’t just meet the goals of this particular shoot, they meet the goals of you as a photographer. In order to choose which images make the jump it 5 stars, we’ll often take a number of our favorite 4* images into the adjustments tab on Aperture and start to play around with treatments. If the image starts to take on dazzling traits when some post production is applied, it’s a good contender for a five star rank.
Often times this five star designation is applied only as an in-house distinction. Everything that has received four stars is going to be shown to the client. It is often an enlightening exercise to have the client choose their favorites from the 4* edit, and independently do a edit of our own. It is interesting to see where the favorites sync up, and it is a good starting point to begin an engaging conversation with the client about which images are indeed the best of the whole shoot.
I hope that you have found some kernels of information that will reduce your suffering, and perhaps even tip the scales toward joy the next time you come home with a pocket full of memory cards.


This is great, and something I’ve done similarly for a while, but over time I have two questions similarly related to this:
1) How would you design or build a machine to tackle large shoots with this editing process in mind? Whats important? How do you manage speed vs backup / archiving of photos?
2) Along those lines, how do you manage and organize large numbers of shoots? With more modern non-destructive editing tools like Aperture and Lightroom I struggle between having a lightweight catalog with a single or small number of shoots in it vs the ease of having a large catalog that allows me to quickly pull out all my good shots and / or filter on a particular genre or tag, what have you tried and what works for you?
Thanks!
Paul,
Our studio workstations are designed for speed in editing with Aperture and processor intensive tasks like photoshop and final cut. Fast processors, lots o’ ram, and multiple hard drives set up with a hardware raid 0 (this means that the computer writes data to multiple internal hard drives simultaneously). The raid is the biggest upgrade I have noticed in terms of how this machine feels as compared to my old workstation which didn’t have the raided drives.
As to the organization of libraries: since we’re dealing with so many images (10 years worth), and we store our libraries on our server, we need them to be relatively small so that we can quickly move shoots back and fourth from the server to individual work stations. We create a separate library for each shoot. We often export high res versions of all of the best images from a given shoot to the Live Work area on our server, this way we can easily access the images without the assistance of the Aperture Library.
Scott, great post and I followed all the comments! One thing I don’t seem to get: What is meant by “the Live Work area on our server”?
Thanks,
Kay.
Kay,
That references a partition on our server where we store the work that is in progress. All of the details are in this post and video from a few months back:
http://blog.chasejarvis.com/blog/2010/06/workflow-and-backup-for-photo-video/
Thanks Scott! Great post!
Just got a Mac with Aperture 3 so gonna def be trying this out, never really used the star rating system before..Excellent stuff Scot.
Scott, thanks this will help me out immensely as I am just starting out as a pro and was dreading having to go through large shoots and figuring out a way to filter/pick the good ones. I have 1 question, I read the older blog post where Chase discussed the work flow you use and am implementing a Raw Data/Live Work type work flow with separate partitions on an external drive. Do you do the rating on the raw data side and then bring the 4*+ into the live work or do you do it on the live work side?
Stephen,
At this step of the process the images are stored in the Raw Data side of the drive. The Aperture library is stored on the hard drive of the computer being used for the edit. The aperture library (local) references the raw files (server) during the edit. Once we have completed the edit, we’ll genrally begin outputting files from Aperture that have had some adjustments. At this point, the work moves to the Live Work partition on the server. Let me know if this is clear. Thanks!
Scott,
I’m still new to Aperture but I think I’m following. You place the original RAW files on a sever (or external hard drive), then in the Aperture Library you reference the file (original RAW file on the drive) and Aperture then saves the changes/editing you do and you export the the files to Live Work? So do you leave the library on the HD of the Mac with Aperture or do save the libraries somewhere else?
This may seem like a lot but I don’t have the skittles Chase does so I’m still a one man show with a Mac, Aperture and some external HD’s for backup. I’m still trying to figure out a good workflow for me that also provides me some back up. Time Machine is great but I still like to have another backup that is easy to access. and can be stored somewhere safe.
Stephen,
You’ve got it. To answer your final question, we store the aperture libraries on our server in the Live Work partition. We create the libraries locally, do the edit, then copy them to the server where they live until a point at which we need to access them again, in which case we copy the library to a local machine, do work, and then move it back to the server.
If you’re using external hard drives instead of a server, you can keep the Aperture library on the external the whole time, Aperture doesn’t mind working across a firewire or USB, you only run into needing to move them if you’re accessing the data via a network drive (server).
Thats really great Info. Though I haven’t edited many photos yet, it gives me an idea what to consider when you have a LOT.
Thanks so much and Keep writing up the good stuff