[Note: I’m excited today to bring back an element to this here blog that we started a while back, but got lost in the mix: monthly guest posts from my badass staff. Since each of them are experts in their own right, I figured you’d be interested in hearing some different perspectives. Today, our tech guru and all things 1’s and 0’s master, Dartanyon, drops some knowledge about how to create a podcast in 6 easy steps…. Round of applause, please…take it away Dartanyon…]
Around here … we make a lot of content. I’m sure many of you who tune into our LIVE broadcasts, have heard me talking about the vast amounts of data we create. One of our favorite things is to make fun videos giving a sneak peek behind the scenes. After we make all of those, we need to deliver them out to you, our awesome community. One way we share content is via our iTunes podcast. This is a quick run down on how we make that happen.
Step One Content: First off, you’re going to need to have a movie (or audio) file in some format. Nearly every video we create passes through Final Cut Pro, where we edit a bit and add our motion graphics. From there we export high resolution Quicktime Movie files (.mov) that we will compress in the next step.
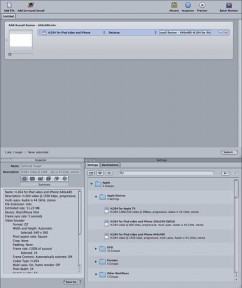 Step Two: Compressions Now that you have yourself a movie, you’re going to need to think about what kind of devices your audience is going to use in order to watch your video. We create a few different compressions right off the bat: We always create an iPhone optimized size for our podcast and at the same time we create a 720P version to upload to youtube.com and maybe our Facebook Fan Page. In addition, we create a 1080P version that we keep here in the studio on our media server for showing on the projector. We create the different resolutions using Apple’s Compressor, part of Final Cut Studio, but you could also use Quicktime Pro or any other video programs you may have.
The iPod|iPhone compression is formatted to fit the iPhone window, or 640 × 480 pixels. We use the H.264 codec because of it’s size, quality, and how well it interfaces with iTunes. The YouTube version is formatted for Hi-Def playback. It’s 1280 × 720 pixels, and again we use the H.264 codec for this one, as suggested in the YouTube specs. We’ve discovered that you certainly don’t have to use this codec for YouTube, but it’s awesome because the videos switch to HD more quickly on the site. Less time for YouTube to convert is a good thing.
Step Three: Setting Up The Podcast I use a fine little piece of software called Podcast Maker, from Lemonz Dream. It’s a handy thing for creating all of the metadata that accompanies our podcast.
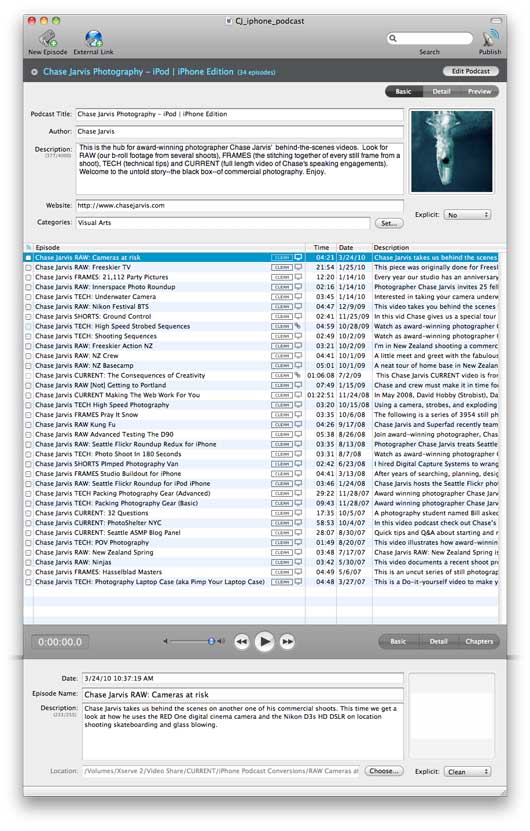
The Podcast Maker interface
I use Podcast Maker to fill out the title of the podcast itself, a description of the podcast, the categories to file it under and so forth. They have a very nice tutorial on their site about some of the finer points to consider when doing the initial set-up, so I won’t get to into those details here.
Step Four: Creating an Episode Creating an episode is very much like setting up the podcast. I simply fill out the description of the episode itself, giving it an image, and any info that is specific to the episode.
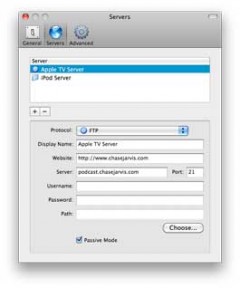 Step Five: Getting the Podcast to the Interwebs. This is the point where Podcast Maker leaves a little to be desired. It’s not that it is poorly done, just not as intuitive as other parts of the software, so pay close attention here when you’re setting up your podcast. I double (and maybe triple) check the folder path, just to make sure everything is going where I want it to.
First, I’m going to assume you have some web server space somewhere, either hosted, or using the built in server in your mac. I use Podcast maker to create a tidy little package of all of the data, and most importantly it creates the XML file (the keystone of the podcast, if you will). Second, it is on to setting up the server info so that hitting “publish” actually goes somewhere. I direct Podcast Maker to place the video file with all of the metadata on our server. Podcast maker also is nice enough to fill in all the iTunes optional fields in the XML so once we get our podcast to the fine folks in Cupertino it will be all ready for people to find in the vast pool of podcasts.
So, now we have made our video, crunched it down to the right size, uploaded it to the great series of tubes … now what?
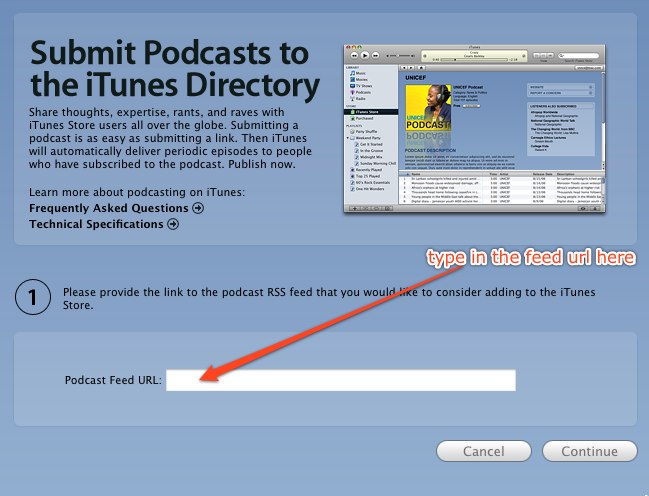 Step Six: Tunes i The next hurdle is getting the iTunes Store to accept your feed. Do consider this … there is nothing you can do to make this any easier, or faster. You submit, you wait.
Open up iTunes (on your computer), and click on the iTunes Store link in the side bar. In the left hand bar, click on “podcast”, and then in the bottom left hand corner click on “submit a podcast“.
Apple has created a nifty document to help from their end. The process is relatively painless. Type in the address of the feed created by Podcast Maker (that’s the XML file), and essentially wait. It usually takes the iTunes Store a couple of days to check you out and add you in to the mix.
When it’s all said and done, you have a rockin podcast!
Now go forth and podcast… And while you are at it,subscribe to ours.








Stephen, I got the first letter and every 1 after EXCEPT Margaret Cho’s. Can you remedy that, please?
this nice\r\n\r\ngreat from bisnis online gratis bisnis online gratis usaha sampingan gratis bisnis online gratis peluang usaha online usaha sampingan online baitulmal usaha sampingan mahasiswa usaha sampingan online peluang usaha online usaha online rumahan camry mobil hybrid terbaik indonesia usaha online rumahan santunan anak yatim bisnis modal kecil bisnis tanpa modal peluang usaha online usaha sampingan online <a judul skripsi pai usaha sampingan mahasiswa judul skripsi pai peluang usaha online blog website business online cerita lucu
\r\n\r\nIklan baris gratis tanpa daftar