A lot of us still shoot film for love and for fun. I’m often dragging around my Polaroid 600, my Hassie 500cm, some Lomo stuff (or these other film cameras)… but it’s next to impossible to have clients get fired up to shoot film in a professionals setting. They wanna see their picture NOW. Well, if you’ve ever been in a pickle over how to get the speed of digital with the look of film, join the crowd. In my studio we use a lot of digital tools to get this look and it seems there ar always new software toys emerging for this very job… But since I’m out on assignment now, I can’t think of a better guy to walk you through a handful of the very best options than my pal Sohail. And no doubt you all will have some other tricks not covered here to add…
Thanks Chase. As the man said, the “look” of film isn’t something we are willing to part with….(and we’re not talking the vintage filters on your iphone or droid..) Some of this comes from an old-school love of grain; some of it has to do with the fact that we just love the way film renders tonality and color. We can all love digital photography just as much, however, so finding a happy medium is the task of this post. I’ll run you through the faves and you can decide for yourself what might suit you well…
For the past year or so, I’ve cycled various plugins and applications through my workflow, trying to find the right add-ons that bring the response curves and grain of old film back into digital images. I found four options that do just that.
The ground rule
I decided that I wanted the look and feel of “real” emulsions like Ilford HP5 or Kodak Portra. Although I’ve liked the look and feel of “vintage” filters that mimic (but not truly reproduce or emulate) old films, I made the conscious decision to seek apps and add-ons that seek to reproduce the look of black-and-white, color negative, slide, and instant film emulsions produced currently and in the past. There are a number of apps today that can apply that vintage look, but that, to me, is not the same as truly emulating film.
The apps
With that simple ground rule in place, I settled on four apps to look over. These aren’t by ANY MEANS all the apps out there that allow you to emulate film, but they are the four that do offer both color and B&W film emulation. They are:
Nik Collection by Google
Until recently, the two plugins from Nik Software, Color Efex Pro 4 and Silver Efex Pro 2, were both available as individual downloads for about $99 each. Following Google’s purchase of the company, the entire suite is now available for $149, which makes this collection one of the best in the “bang for your buck” category. FWIW, this is the one Chase makes primary use of in his studio.
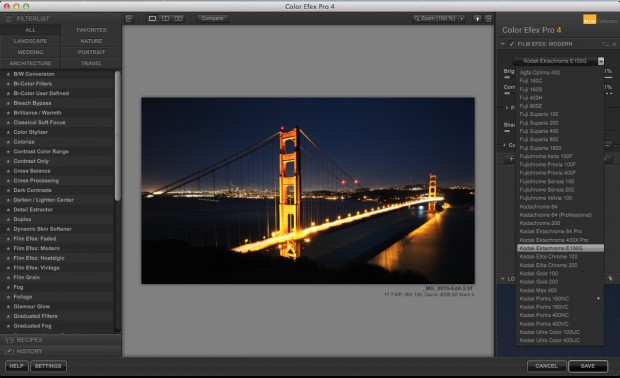
Color Efex Pro 4 has a number of film effects, ranging from the aforementioned “vintage” effects that don’t appear to be based on any specific film stock, to effects based on a very nice list of modern color films.
From slide films like Velvia to modern negative stock like Portra, Color Efex Pro 4 is a first-rate one-stop-shop for the most popular emulsions out there.
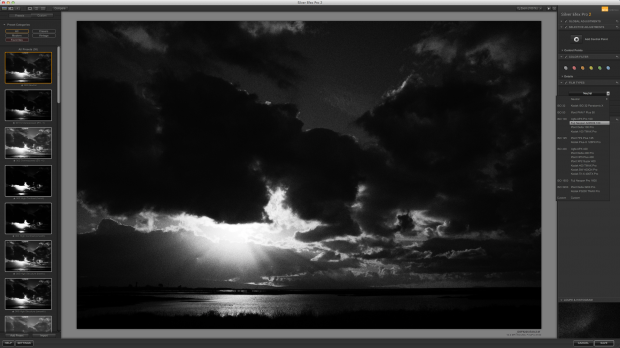
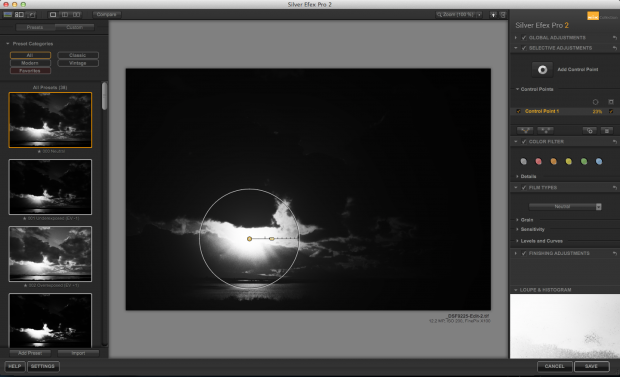
Silver Efex brings a similar range of choices for B&W images. Some of my favorite films are represented here; Ilford Delta 100 and 400, Fuji Acros 100, and Kodak Tri-X. The interface is somewhat similar to that of Color Efex Pro, and is pretty simple to use.
Silver and Color Efex also include Nik’s unique Control Point technology, which lets you make some pretty sophisticated selective adjustments without having to deal with masks and selections in photoshop. Additionally, Silver Efex Pro also gives you a range of color filters you can use to adjust tonality in your B&W images. The Red filter, for example, can darken blue skies, while the Green filter lightens greens, helping to separate a flower from a background of bushes.
The Nik Collection (which includes Silver and Color Efex) is available now for $149.
Alien Skin Exposure
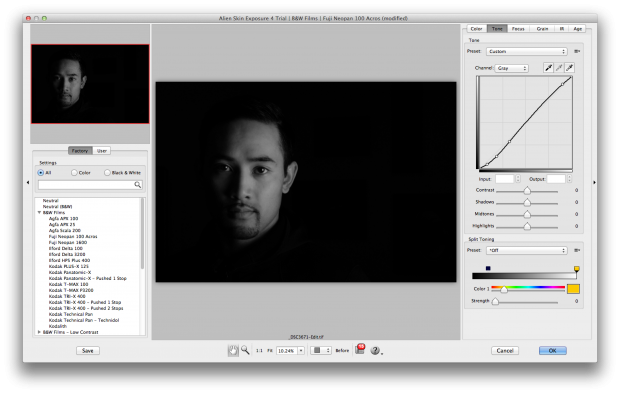
Alien Skin’s Exposure plugin for Lightroom isn’t just a film effects plugin; it also places a number of powerful exposure controls at your disposal. It gives you very specific control over elements like film grain, aging, and vignetting, in addition to letting you adjust the tone curve of your images.
The interface is pretty straightforward and functional. Very little consideration seems to have gone into making it “pretty”; rather, it uses the most simple possible interface elements. Most of the research into this app seems to have gone into the “under the hood” area rather than window chrome.
This is a good thing. The app is reasonably fast, applying effects and saving files very quickly. That last item might seem like a small thing, but when you’re saving 100MB+ .tiff files, the extra few seconds is kinda nice.
For those who aren’t looking to emulate film, Exposure also offers many other presets and effects out of the box as well. One major ding against them, however: they don’t make an Aperture version of their plugin. Aperture users will have to round-trip their images through Photoshop to take advantage of Exposure.
Alien Skin Exposure is available now for $199.
DxO Filmpack
DxO’s Filmpack is available as both, a standalone plugin or as part of DxO Optics Pro, which is a collection of various image tools, from perspective correction to sharpening and denoising.
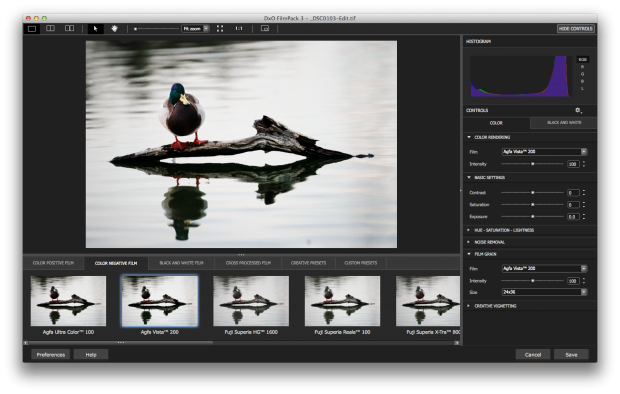
There’a decent number of films represented here, from slide films like Velvia to black-and-white emulsions like Ilford Pan F 50. They also pack in refinement tools to adjust elements like HSL (Hue, Saturation, Luminance), noise, and film grain.
The interface is pretty straightforward and well-designed. You pick your film, make your deeper adjustments, then close it out. DxO installs two versions of the plugin, a 32-bit one and a 64-bit version, so if you’re on an older version of Lightroom, you can still go back and use the 32-bit version.
Filmpack itself also has two tiers, “Essential” and “Expert.” They’re priced at $49 and $99, respectively, and the “Expert” version, in addition to having certain emulsions that the “Essential” version doesn’t, also has a few features like batch processing and noise reduction.
DxO Filmpack is available for $49 (“Essential”) and $99 (“Expert”).
VSCO Film
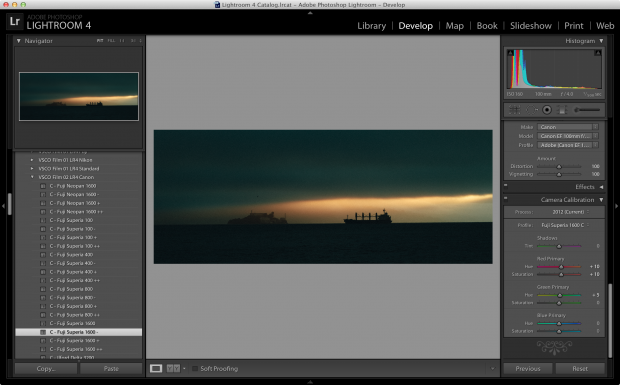
VSCO is perhaps the most unique of the plugins I worked with. Available for Lightroom, Camera RAW or Aperture (I tested the Lightroom version), the plugin is implemented in Lightroom as a collection of presets and camera profiles, all of which can be accessed without ever leaving Lightroom.
There are currently three collections available; 01, 02, and 03. Each adds a number of specific films to the roster of available emulsions, building on the previous version. Every film is made available in four presets. There is a normal version that is, according to VSCO, the most faithful representation of what that particular film would look like for the image you’re working on, a “-“ version that tones the effect down somewhat, a “+” version that ratchets the effect up, and a “++” version that pushes it even further.
Each of the three packs is sold separately, and is priced at $119, making VSCO’s collection the most expensive of the lot here. VSCO does offer a loyalty discount, so if you buy one of the packs, the others are available for a discount, bringing the price for all three packs under $300.
It should be noted that the real strength of VSCO is, in my opinion, their combination of both camera profiles and presets. They currently have Canon and Nikon camera profiles for all three packs, and in something of a first, they also have Fuji presets for 01 and 03. A Fuji preset for 02 is apparently in the works.
You can certainly apply the generic “Standard” presets to images shot on other cameras, and they still do a neat job, but the effect won’t be as faithful to the original film you’re looking to emulate. In my quick tests, RAW images taken with a Sony A99 still looked pretty darn good though.
Aperture users, take note that the camera profiles feature in VSCO Film isn’t available to you. Aperture doesn’t support that feature, so that isn’t VSCO’s fault, and the plugin for Aperture is priced at $79 to reflect that loss in functionality.
VSCO Film is available now for $119 per pack.
The results
I worked on several images over the last few months, from portraits to landscapes, and came away with some pretty clear ideas and opinions on the strengths and weakness of each plugin. The thing to remember is that these are just that — ideas and opinions. I’m applying my subjective judgement to these images, and that should be taken into account when you make your own choices.
That said, let’s have a look at what I found.
Initially, I thought of judging them based on criteria such as ease of use, speed, features, and final product.
Ease of use
After using all four apps over a few weeks, the first criteria almost fell by the wayside, since all four are pretty straightforward to use. A few factors did arise, however, that are worth mentioning.
The Nik Collection was perhaps the only one that had a bit of a learning curve. That’s directly due to its Control Point technology, which you don’t have to use unless you want to adjust specific parts of your image — and if you do, the learning curve is absolutely worth it.
VSCO was the other one that has a learning curve, but again, only for a specific reason. If you do things like retouching skin in Photoshop, there is a workaround you’ll need to use to avoid smearing the grain pattern and messing with the other settings for your images.
Speed
Hands-down, VSCO was the fastest of the lot. Since you never leave Lightroom, there’s no round-tripping of images through an external program. Even better is the fact that the presets render lightning fast, and you can reset them with just a click.
Alien Skin’s Exposure was the other app that did a pretty decent job of round-tripping images from and to Lightroom. While it’s not orders of magnitude faster than its competitors, as I mentioned, the few extra seconds you eke out while working with 100MB+ .tiff files is kind of nice.
Features
If you’re looking for a plugin that does some pretty advanced film effects and has a good selection of emulsions to chose from, you can’t go wrong with the Nik Collection from Google.
Between the truly awesome Control Point technology and the collection of popular films like Velvia and my personal favorites like Acros, the Nik Collection knocks it out of the park in the “packed with a bunch of features” category. At $149 for the whole dang thing, it’s also the clear winner in the “bang for your buck” section.
Lest you think it’s the clear overall winner in this criteria, however, let me throw a twist at you. VSCO has what I believe to be two truly killer features: its edits are non-destructive, and it actually takes your specific camera model’s output into consideration when applying its edits (as long as you shoot Canon, Nikon, or Fuji).
All the other apps output TIFF files. This is just fine; Photoshop does the same when you roundtrip files from Lightroom to it and back. What you lose there is the ability to fine-tune the changes after the plugin is done exporting the finished file back to Lightroom.
Since you never leave Lightroom, and are working on the original RAW file, VSCO’s edits are easy to roll back the edits – just select the “RESET VSCO FILM” preset in Lightroom and you’re back to your starting point. You can also adjust the preset’s effects at any time simply by moving the sliders in Lightroom or Camera RAW around to get your final look.
So, to me, this criteria has a two-way tie between Nik and VSCO.
Final Product
Here’s the meat of the review. The long story is below, but the short story is this: for my use, it’s a two-way tie for first place between VSCO Film and Nik Collection.
Let’s dive in a bit more.
In the images below, I’ve used the film preset in each app/plugin, with no additional adjustments in the plugins themselves. Any adjustments were made beforehand in Lightroom. Global adjustments were restricted to white balance and exposure, and there are some localized adjustments like dodging, burning, and skin smoothing. The original image in each case is shown as well.
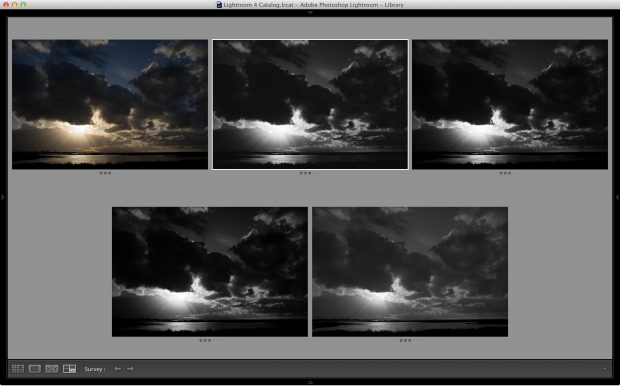
In each of the image comparisons below, the original starting image is shown in the top-left. Clockwise from there, we have the adjusted images from VSCO Film, Nik Collection, Alien Skin Exposure, and DxO Filmpack.
Let’s start with B&W. I chose a film that all four apps had in common, Ilford HP5. The subject is the wetlands in the Alviso area of the Don Edwards Wildlife Refuge.
Clockwise from top-left, we have the original DNG with basic Lightroom edits for exposure and white balance, followed by VSCO Film, Nik Collection, Alien Skin Exposure, and DxO Filmpack.
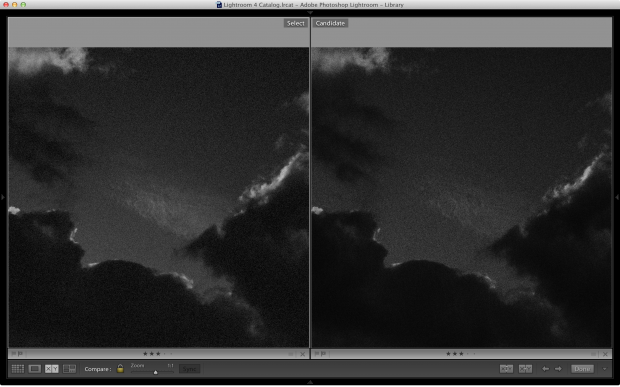
What struck me here was how similar Nik and VSCO’s output was. VSCO laid the grain down a bit more evenly, while Nik Silver Efex was more selective about it. Silver Efex, on the other hand, crushed a little of the detail in some midtones and highlights.
Alien Skin’s Exposure, on the other hand, tended to underexpose the sky, and lay down far less grain than either VSCO or Silver Efex for this film emulsion. It did, however, do a great job of holding detail throughout the frame.
The real surprise here was DxO Filmpack. The output is nothing like that of the other three apps; in fact, I re-ran the original file through Filmpack again just to be sure, and the results were replicated exactly. DxO’s output looks almost washed out in comparison, with far less contrast than I remember seeing in images taken with actual HP5 film. The grain pattern is weak as well, which is odd considering that HP5 usually has some pretty good contrast with decent grain.
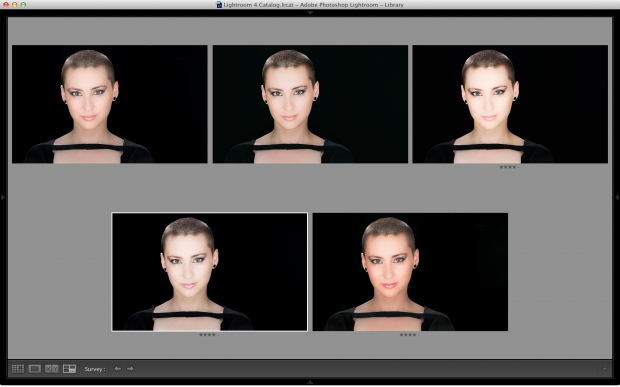
The color images showed a similar disparity in final results as well. I chose a portrait for the this round of images, and picked an image I’d made of my friend Alexandria (an awesome photographer in her own right). The image had gone through a bit of retouching in Lightroom, but Alex has pretty flawless skin, so I didn’t need to round-trip it through Photoshop.
The film I chose was Kodak Portra NC. Portra was originally available in two flavors, NC and VC, but the two lines were combined into one single Portra emulsion a while back. Portra NC is also one of the films that all four apps had in common, so I went with it over the standard version.
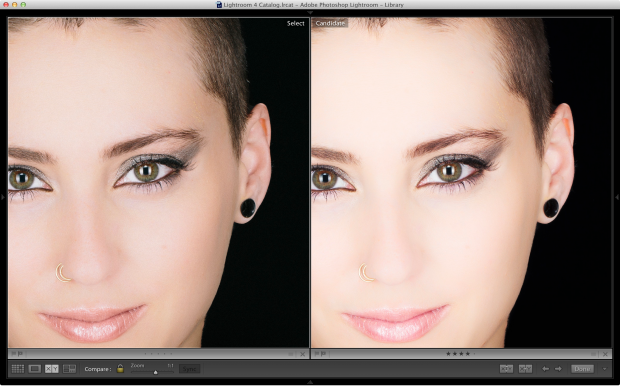
Once again, clockwise from top left, we have the pre-film-effect Lightroom version, followed by VSCO, Nik Color Efex, Alien Skin Exposure, and DxO Filmpack.
Here, Nik Color Efex and Alien Skin’s seem to be the two closest, but both look somewhat washed out. I almost like that effect, but VSCO’s render looks more natural to my eye. Color Efex and Exposure really reduced detail in the highlight areas, while VSCO managed to retain them nicely.
DxO managed to disappoint me here again. Their render is, I think, over-saturated with a strong bias towards red. In fact, if you look towards the base of Alex’s neck, it almost looks like she’s blushing. DxO also reduced contrast in some areas and laid down a heavier grain pattern than any of the other apps.
So who’s the clear winner for the “Final Product” criteria? I’d say it’s a tie between VSCO and the Nik Collection.
Conclusion
As I mentioned earlier, this test ended in a two-way tie for first place between VSCO Film and the Nik Collection by Google. but thing is that there is no real way to quantify a choice when it comes to applications like these.
The final product and featureset are the two most important things to me, and in both those categories, I came up with a tie between VSCO and the Nik Collection. I do wish VSCO had some slide films in their packs; this is a glaring omission, but then so is the lack of “real” instant film emulsions from Color Efex. The Nik Collection has that awesome Control Point technology, but you can apply VSCO’s effects to video in Lightroom.
In an ideal world, I’d tell you all to go buy both, but that’d run you upwards of $450. Instead, I’d say this – you can’t truly go wrong with either. Look at the samples here and elsewhere on the interwebs, and decide for yourself.






Nice article with very useful sample shots. I was considering both VSCO and Nik, but I think I’d go with Nik – prices of VSCO are unreasonably high IMO.
This again made me feel right about choosing VSCO over Nik Color Efex. One thing i’m not happy about VSCO 2 is, that it’s effect is too strong on the shadows for my taste. One is loosing details too quickly. If i’d only have the time to tweak one or two of their colour presets plus a black and white one to make them look more like “me”….
VSCO for video? How crazy is that? Overall great piece of software!
Yeah, the video feature just totally rocked it for me. A whole video, done up with Kodak Portra-esque styling? Sign me up!
The Film Look cannot be reproduced digitally and that’s a good thing, because you can still shoot film. What you will learn as a photographer, beyond the look of film, is immeasurable. You’ll become a better artist and photographer, because your vision and ability to see the shot becomes clearer when you have to think about how many more frames are left in your camera. Sharpness and detail will apply to your minds eye, as much as to your pictures look. Learn to buy and shoot FILM and enjoy using it along with digital.
I found EXACTLY the same thing: Nik and VSCO are very close, with Nik crushing the highlights a bit more than VSCO:
http://www.mfphotography.ca/2012/09/14/toronto-street-photography-digital-trix/
That having been said, neither of these are really nailing the ‘film’ look, because they’re both based on digital files which don’t have the dynamic range of film. Moreover, as EddieBaba said, shooting film makes you approach the shot differently, so you WILL take different photos (maybe better, maybe not).
Film + digital = photographic bliss.
agree mike – but little reminder is that the subject of the post is about how to get the closest film look w a digital capture. and moreover… i’d bet dollars to donuts that i could show you a scan of film and one of these files and you couldn’t differentiate… just sayin 😉
I started out using VSCO and was pleased with the results, but I have since moved on to the light room film emulsion presets by red leaf studios. They are fantastic!
Thank you for this comparison of the most common and viable film emulations. I now have both NIK and VSCO (film 01 & 02) and while in agreement with your sound conclusion I tend to mostly lean on VSCO since it does not require the round-tripping and large TIFF files that NIK requires, as mentioned. Faster workflow and lower disk space usage pushes VSCO ahead for me.
VSCO is nice, but I find it quite expensive, I like the same Photoshop actions from EyesMeal Studio and they are definitelly at an affordable price. And if you are searching for wide variety full collection has more than 90 films emulated.
Was their fan before but later discovered film presets from http://www.reallyniceimages.com and now using mainly their Kodachromes. It looks they outperform vsсо in vintage/archetype films.