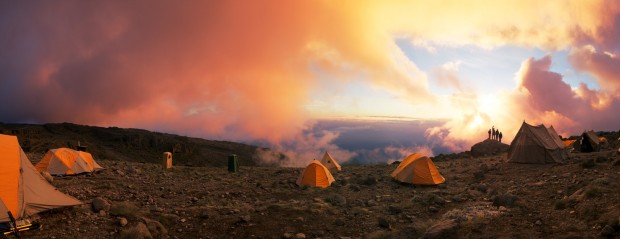
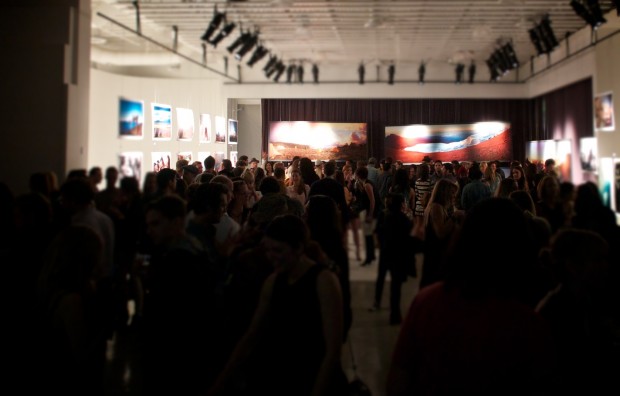
Earlier in the week I shared my gear list for the hike up Kilimanjaro with Summit on the Summit. While on the mountain I snapped off a slew of panoramas and sent them to my buddy Mark, who does digital retouching with his company PARADOX VISUAL. I wanted him to build a BIIIIIG panorama that could be auctioned off for Summit on the Summit. And when I’m talking big, I’m talking 4 feet tall and 20 feet long. (see them in context of the gallery at the end of this post). Big, right? I’ve asked Mark to give us a little insight into the methods he used for creating that panorama, which you see in digital form above. I’d say he did a bang-up job. Take it away, Mark.
Thanks, Chase. First things first. I want to thank Chase and his crew that I worked with on building these panoramas — Kate, Megan, and Norton. It was a privilege working with you and a privilege to be a part of Summit on the Summit’s campaign for water conservation and awareness.
Now on to the technical business.
The advent of digital photography has not only created easy access to photography like never before, it also has opened up creative and technical possibilities in image making that were once unimaginable. Creating large panoramas with theoretically limitless resolution is just one of those new frontiers. Photographers are pushing the processing limits of computer hardware with interactive panoramas well past the gigapixel range. The largest I found is a 272 gigapixel panorama of Shanghai, China. Pretty huge.
I’ll be talking about something a little easier to attain for those of us working on Mac Pros and iMacs (and even Windows machines I guess) — panoramas composited from far fewer frames than that needed to get a 272 gigapixel panorama.
SOME BASIC TIPS TO SHOOT FOR PANORAMAS
To get the best results it is recommended to use a tripod. Ideally you would also shoot using a tripod head that allows the camera to rotate around the nodal point to avoid issues with parallax. Unless you plan on shooting a large amount of panoramas, these tripods may not be an investment you want to spring for now (unless you wanted to rent one). Luckily there is plenty of software out there to save our bacon, let us shoot handheld and still get great results.
Of course there are a few tips to help while shooting handheld:
_The wider the lens you shoot with, the harder it is for software to overcome distortion. It’s preferable to shoot with a 28mm over a 14mm or make multiple rows with a 50mm over that 28mm to cover the same area. And the bonus is you get even more resolution in the end.
_Shooting more frames with the camera in the vertical position reduces the apparent distortion.
_Most recommendations are to have at least 15% overlap between frames. I tend toward 33% to give software as much real estate to work with.
_Keep the camera level through all the exposures.
_Shoot in manual exposure mode to lock in the same exposure settings through all the frames and to have the same depth field through all the frames.
_Shoot in manual focus mode to keep the same focal distance through all the frames.
There are many sites on the Internet with plenty of additional tips and tricks. Have a look around and you’ll have no problem bumping into one. This article will focus on the stitching process involved in producing the gargantuan panoramas Chase Jarvis shot on Mt. Kilimanjaro with Summit on the Summit. We did five panoramas but I will focus on the one panorama that needed the most work.
THE MT. KILIMANJARO PANORAMAS
Chase shot several panoramas on a Nikon D4 and a 24-70mm f/2.8 Nikkor lens. We ended up building five to be auctioned to benefit Summit on the Summit. The frames were shot vertically and there were 5-8 frames per panorama. Up until now I have used Adobe’s Photomerge that is part of Photoshop to stitch panoramas together. Before I saw the panoramas, all I knew was that Chase wanted them printed large. Really large. They were to be 44 inches tall, which meant some of them would be nearly 14 feet wide. I thought this would be a good opportunity to purchase a piece of software I’d been admiring for awhile. PTGui is one standalone panorama stitching application that caught my eye. I had researched many of the stitching software applications available and I chose PTGui based on many good reviews, a personal recommendation from a photographer that had been using it for awhile and the fact that it has the capability of creating HDR panoramas for use in CGI image based lighting. Knowing how big these panoramas were to be printed, I wanted the best tools at my disposal. And why not take a little risk testing new software to make some of the biggest prints I’ve ever made for? What’s life without some risk taking, right?
Adobe’s Photomerge is pretty amazing in its own right and I’ve had it stitch some wobbly frames into some clean panoramas before. It’s main drawback, though, is that there is not much user control (other than the type of projection it stitches the frames with) if it runs into problems. If it can’t create a clean panorama, that’s the end of the road. There will be much repair work to be done in Photoshop.
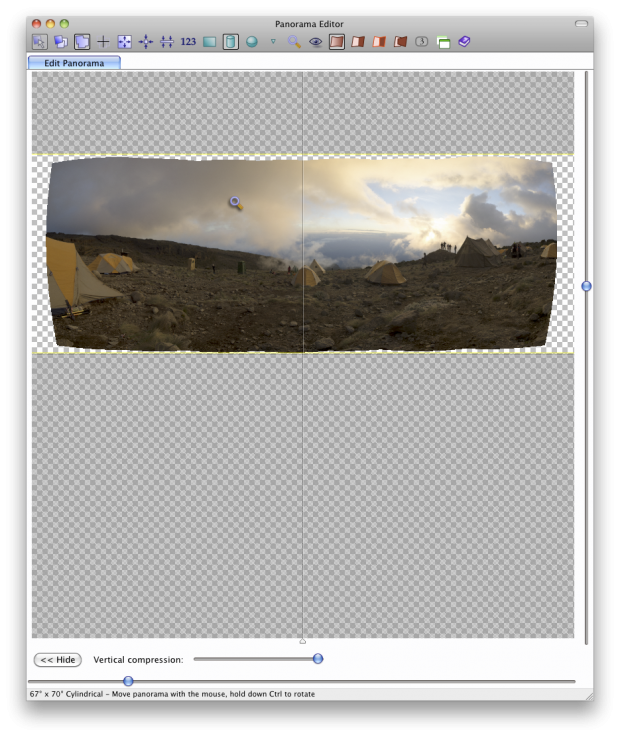
With PTGui you have the ability preview the panorama before it is actually rendered. You can try out different projection methods to see which best suits your needs. I used cylindrical projection for most of the panoramas. It offered the least distortion to the horizon. But I still needed to do some warping in Photoshop to get the horizons perfectly straight and level and to pull the corners out to fill the frame.
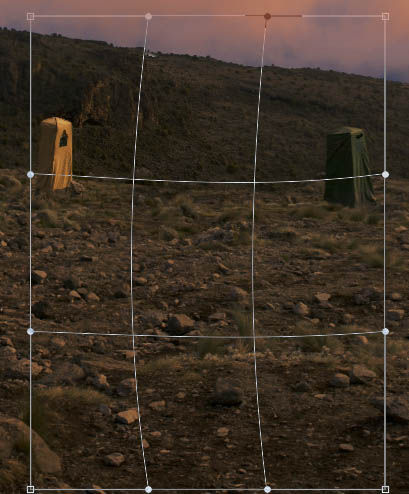
While we’re on the subject of warping, I prefer using the Warp tool over the Liquify tool for larger tweaks of pixels. When used for little tweaks Liquify is great, but when used for larger movements over larger areas the stretching and smearing of the pixels can be quite apparent. First, I draw a selection with the marquis tool that is significantly larger than the area that I’ll be transforming. I then hit Command+J (Layer/New/Layer via copy) so that I can work on the area without affecting the main layer. To bring up the Warp tool hit Command+T (Edit/Free Transform). Once the Free Transform handles are visible use either Control+Click or Right Click to bring up the contextual menu where Warp is found. You can manipulate any of the points and/or handles or click+drag directly on the areas in the middle of selected pixels. The trick though is to only manipulate the middle areas. This leaves the edges unaffected so they remain seamless with the surrounding areas. Once you’re satisfied with the Warp hit Return/Enter or doubleclick on the selected area to accept. If the manipulation is significant you may have a seam appear at the edges. Simply add a layer mask to the Warped layer and subtly mask the little area out and you should have seamless image again.
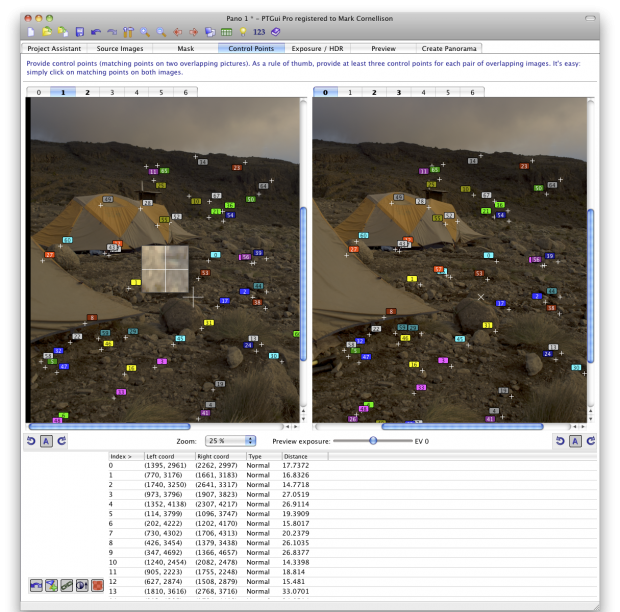
If PTGui can’t get a clean seam for some reason, you can help it along by giving it more information to work with. You are able to access PTGui-created paired control points between frames that identify shared features between frames. Sometimes the paired points PTGui automatically creates are lined up correctly. You can go in and manually move the points to make sure they are over the same spot in each frame. You can also add your own control points to help PTGui identify where the frames align. The more points the better.
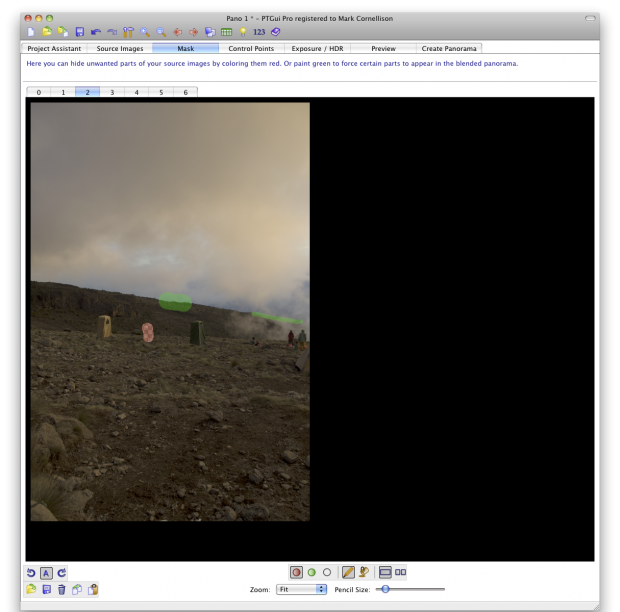
Another powerful feature of PTGui is you are able to force the software to include or exclude portions of specific frames. Along the left third side of the panorama PTGui was not creating a good seam of the ridge in the background. I played a bit with forcing PTGui to only use portions of the #2 frame. It helped it create a cleaner seam along the ridge. In the screenshot, the green is where I painted and PTGui was forced to use that area of frame #2 to create the final panorama.
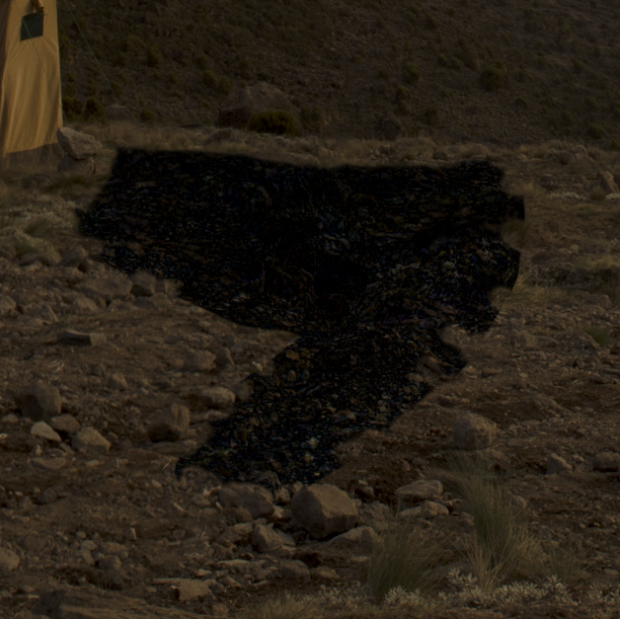
As good as software is these days, they can’t do everything perfectly. No matter how I cajoled PTGui there were some areas of the panorama it couldn’t pull off seamlessly. In a few spots the ground gave PTGui trouble. If the final destination of these panoramas was just the web, these slightly soft seams would probably have been unnoticeable. But at nearly four feet tall they would be obvious. In these cases I needed to process individual frames from the original RAW files of the ground to bring into the panorama. Since any panorama software distorts individual frames to create the final panorama, these portions I brought in needed to also be distorted to fit into the panorama. I’m guessing one of the least-used layer blend modes in Photoshop is Difference. How it works is quite simple and can be useful in the right situations. This is one of those situations. When a layer is set to Difference and the pixels below that layer are exactly the same, it displays them as solid black. If they display as any other color they are different. This often works great for aligning layers. You can see in the screenshot below several spots that are black.
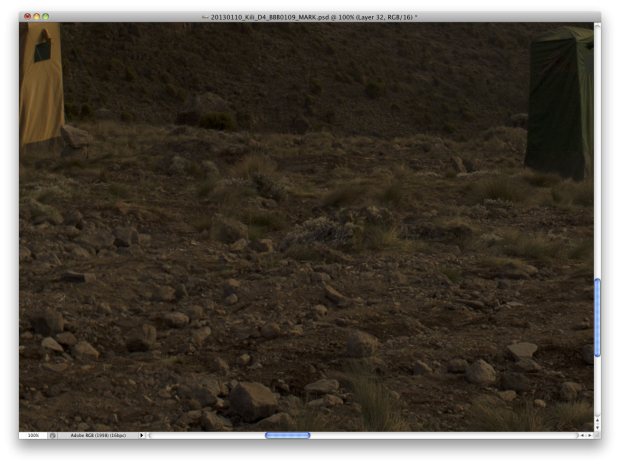
Once the patch layer is as close as possible, it then took some delicate masking to fit the patch in nicely. I find it works best to paint the mask to an edge already in the image, like one of the rocks. The natural edge is a good way to hide any edge created from the mask.
A small touch that I find very useful when scaling images well beyond their native resolution is adding some simulated grain. It is also useful for panoramas because in the stitching process pixels get stretched and squeezed and the natural noise pattern or texture of the camera’s sensor is warped. So, the simulated grain can cover up some of the pixelation from scaling the image up and create a uniform texture over the whole image. Even if the grains need to be large to cover up the roughest parts of the image, it most often looks better than the distorted and abused pixels underneath. Adding noise or grain can also help if you are having any banding issues in areas with gradients.
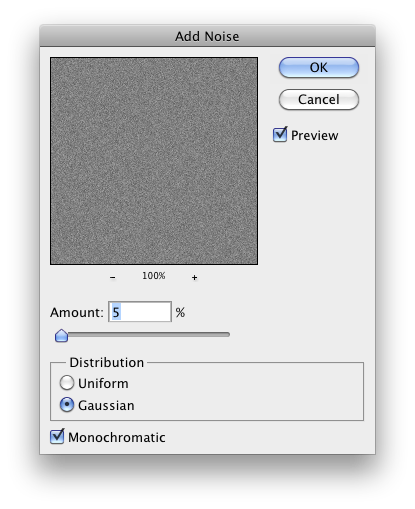
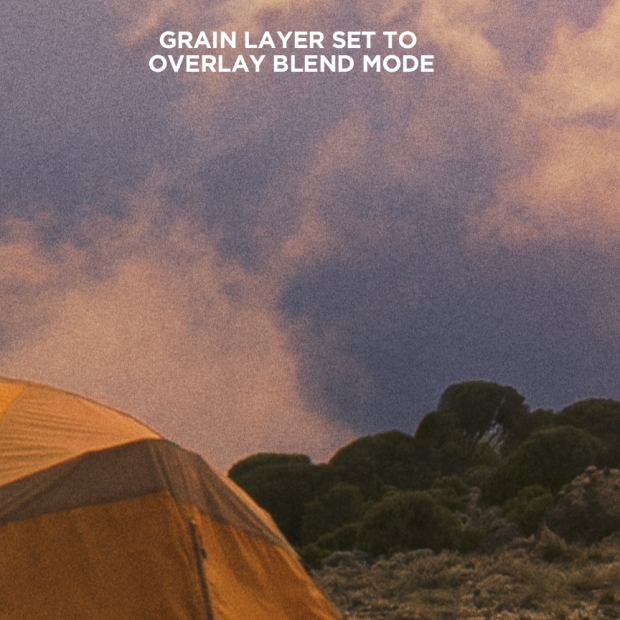
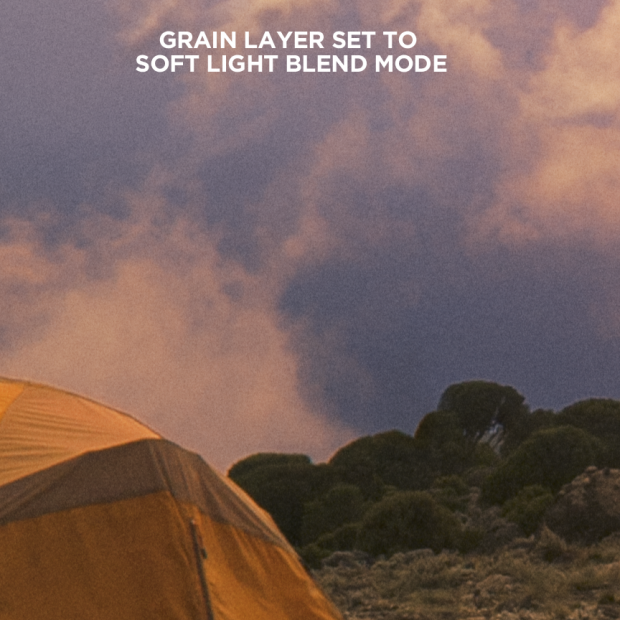
The grain process is simple. Create a new layer with the blend mode set to Overlay or Softlight. Fill it with 50% gray, the neutral color for these blend modes. Add noise — Gaussian, Monochromatic.
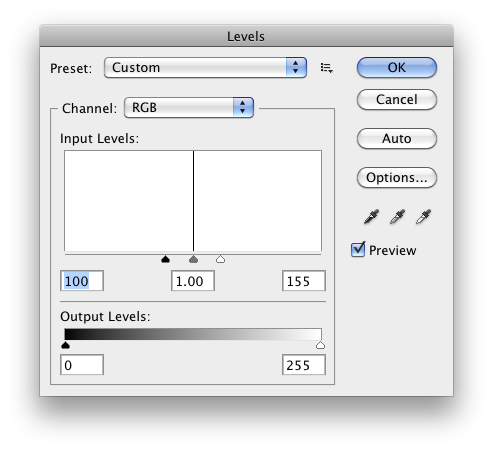
Adjust levels by bringing up the black point and bringing down the white point. This adds contrast and makes the noise a little more clumpy or grain-like.
And last, it needs just a touch of the Gaussian Blur Filter. When the Grain layer is set Overlay, the grain will be more apparent. Setting it to Soft Light makes the grain a little less apparent.
Please note, these settings were specific for this size image. Adjust to suit a particular image’s needs. One last note on adding grain: add it after you’ve scaled an image up to its final print size. If you add it before, the grain gets scaled with everything else and will huge and scary and ugly.
The other bits of retouching I needed to do were less specific to building a panorama. I had to remove all the people other than the group on the rock on the right. I replaced that group on the rock with another group from a separate frame Chase shot just of the group specifically to put in the final panorama. I was also provided PSD files with layers of the panoramas as guides. I just needed to repurpose and fine tune the adjustment layers from those files in the final panoramas.
Two important points I like to remind folks of when I teach:
_In Photoshop there is rarely only one way to get from A to B. I share how I work as a starting point for people to start experimenting and to help get a better understanding of how Photoshop behaves.
_I find it extremely helpful to have someone else look at my work to see if I have done it cleanly and believably. After staring at an image for a long period of time, sometimes it can be difficult to be objective. In my case, I have a client who is making the final judgment call on an image. But the second person can be a friend or spouse who can look at the image with completely fresh eyes. If another person is not available, take the image to what you consider final. Go away for awhile. If you have time, go away for some days. Then take another look over the whole image looking for problem areas, especially for seams that are soft and unnatural looking.
Thanks for reading and good luck!
Want more Panorama tutorials? Check out this past post on How To Shoot a 7 Gigapixel, 60-foot Wide Photo in 5 Easy Steps.








The period also noticed the early levels of costume jewelry ,
with fis scale coated glass beads rather than pearls or conch shell cameos instead of stoe cameos.
Realize what sort of gemstones before a jewelry invest in.There are actually a few exceptional sorts of ,discount tiffany jewellery,gallstones: imitation, man-made and bogus. tiffany jewellery are both actual rocks, but representation is merely plastic-type material pigmented to seem like the the real guy. All natural gemstones are merely below ground and artificial jewelry usually are evolved at a labrador.Create a very critical look within the piece you want, in that case said together with several other types you are interested in. Watch out for steps in which a few traders makes use of to manufacture a stone appearance greater.
Great tutorial. I would go to say it is better than most on the PTGui information site.
The projext is a definate WOW factor going on, would have loved to see the finished image when it was exhibited. Thank you for sharing both your knowlege and images.
Beneficial career. You need to generate far more these kinds of threads. You’re really good at publishing.
I’m hearing great things about PT Gui, what about your preferred tour software?