
The conversation around AI is loud. It’s full of hype, fear, and wild speculation. But if you’re a working creative professional, you don’t have time for noise. You need to know one thing: will this new technology make your work better, faster, and more profitable, or is it a distraction? When it comes to Adobe Photoshop, a tool that’s as familiar as the back of your hand, the integration of AI isn’t just a new feature—it’s a fundamental shift in workflow that solidifies its place in the ongoing debate between platforms like Affinity Studio vs Adobe Creative Cloud. Ignoring it isn’t an option.
The real question is how to leverage it without sacrificing the quality and control that define professional work. This is about moving from being a generator of pixels to an orchestrator of creative vision, using AI as a powerful, tireless assistant, not as a replacement for your hard-won skills.
What Are Photoshop’s AI Features?
First, let’s be clear: “Photoshop AI” isn’t a separate piece of software. It’s a suite of features woven directly into the Photoshop you already use, all powered by Adobe’s generative AI model, Firefly. This is a critical detail. Unlike other AI image generators that pull from questionable corners of the internet, Firefly is trained on Adobe Stock’s massive library of licensed, high-resolution imagery and public domain content. This distinction is crucial when comparing it to free tools like Meta AI, which have different training data and commercial use implications. This means the assets it generates are designed to be commercially safe, a non-negotiable point for any serious professional.
At its core, the technology allows you to use simple text prompts to execute complex image manipulations that would have previously taken hours of meticulous work. Think of it as a direct line of communication between your creative intent and the pixels on the screen. Instead of just pushing pixels around with brushes and clone stamps, you’re now guiding a powerful algorithm to do the heavy lifting, right inside your existing layers, masks, and workflows. You can find out more on the official Adobe Photoshop website.
How Creative Professionals Can Use It
The real test of any new tool is its practical application in a professional workflow. Does it solve real problems? Does it open up new creative possibilities? Let’s break down the core features and how you can actually use them on a real project.
Generative Fill
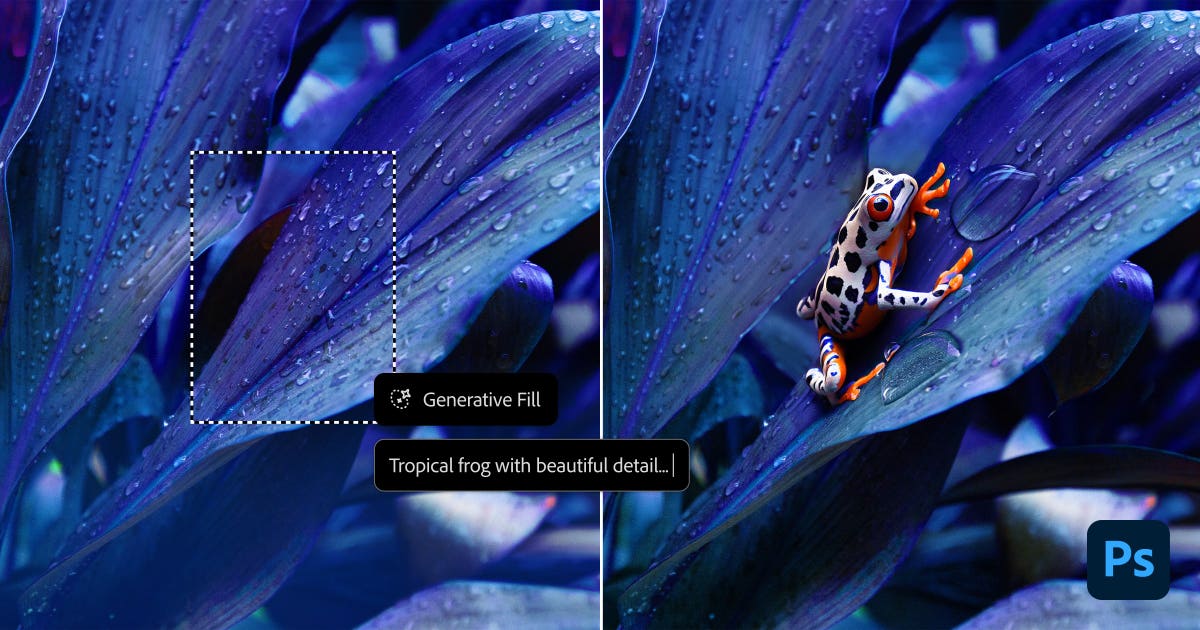
This is the feature that gets the most attention, and for good reason. Generative Fill allows you to add, remove, or replace elements within an image using a text prompt. It’s the next evolution of Content-Aware Fill, but with a massively expanded creative horizon.
How It Works (Simple Version)
You make a selection with any tool—Lasso, Marquee, Pen Tool, it doesn’t matter. A contextual taskbar pops up. You click “Generative Fill,” type a prompt describing what you want to see in that selection (e.g., “a vintage leather armchair,” “stormy clouds,” “remove the person in the background”), and click “Generate.” Photoshop gives you three variations on a new, non-destructive “Generative Layer,” complete with a layer mask.

Professional Use Cases
- Complex Object Removal: Content-Aware Fill is great for simple backgrounds, but it struggles with complex scenes, textures, and perspectives. Generative Fill is a beast at this. Need to remove a tourist from a detailed architectural shot? Or a distracting power line from a landscape with a complex sky? Make a loose selection, hit generate without a prompt, and watch it work. It understands context, light, and shadow in a way previous tools couldn’t.
- Concepting and Ideation: This is HUGE for commercial and advertising work. A client wants to see what a product would look like in a different setting? Instead of spending a day sourcing stock photos and building a composite, you can use Generative Fill to instantly add elements to a scene. Add a “modern floor lamp” to an interior shot or change the “boring gray t-shirt” on a model to a “blue denim jacket.” It dramatically speeds up the mock-up and approval process.
- Surface and Texture Swapping: Need to fix a patch of dead grass in a lawn for a real estate shoot? Select the area and prompt “healthy green grass.” Need to replace a cracked section of pavement? Select it and prompt “clean asphalt texture.” It’s incredibly effective for environmental retouching.
Actionable Tips for Pros
- Be Specific: Don’t just type “add a car.” Type “add a red 1960s convertible sports car, side view, in bright sunlight.” The more detail you give the prompt, the more control you have over the result.
- Generate on Empty: For adding completely new objects, make your selection on your image layer, then create a new, empty layer. With the selection still active, use Generative Fill on the empty layer. This keeps the generated object completely isolated from the source image for maximum flexibility.
- It’s Not Final: The generated result is rarely perfect. Think of it as a brilliant first pass. Use the layer mask to blend it, use a Curves adjustment layer to match the contrast and color, and don’t be afraid to use your traditional tools—Clone Stamp, Dodge and Burn—to refine the generated pixels into something that meets your standards.
Generative Expand
If Generative Fill changes what’s inside the frame, Generative Expand changes the frame itself. This tool allows you to extend the canvas of an image, and the AI intelligently fills the new space with content that matches the original photo.
How It Works (Simple Version)
Select the Crop Tool (C). Drag the crop handles outside the image boundaries to expand the canvas to your desired size or aspect ratio. In the contextual taskbar, just click “Generate.” The empty area will be filled in, seamlessly extending the image.

Professional Use Cases
- Recomposing for Different Formats: This is a game-changer. You shot a beautiful vertical portrait, but the client needs a horizontal version for a website banner with room for text. With Generative Expand, you can extend the sides of the image, and the AI will build out the background to match. What was once a nightmare of cloning and patching can now be done in seconds.
- Fixing Tight Compositions: We’ve all been there. You shot a moving subject and cropped it just a little too tight in-camera. Generative Expand lets you add that crucial breathing room back into the composition—more headroom, more space in front of a subject’s gaze, more foreground.
- Creating Plates for VFX and Compositing: Need a clean background plate without the subject? Expand the canvas, let the AI fill in the world, and you have a perfect foundation for more complex compositing work.
Actionable Tips for Pros
- Expand in Stages: If you need to expand a lot, don’t do it all in one go. The AI performs better with smaller, incremental expansions. Expand one side, generate, then expand another.
- Watch for Repetition: When expanding images with repeating patterns (like foliage, water, or textiles), the AI can sometimes get lazy and repeat elements. Always inspect the generated areas closely and use your healing and cloning tools to break up any unnatural repetition.
- Guide the Generation: You can loosely select an area of the original image near the edge you’re expanding to give the AI a hint about what textures and elements you want it to prioritize.
Neural Filters
Neural Filters are less about creating something from nothing and more about advanced, AI-powered image manipulation. It’s a dedicated workspace (Filter > Neural Filters) filled with powerful, often experimental, tools for everything from portrait retouching to creative color grading.
Professional Use Cases
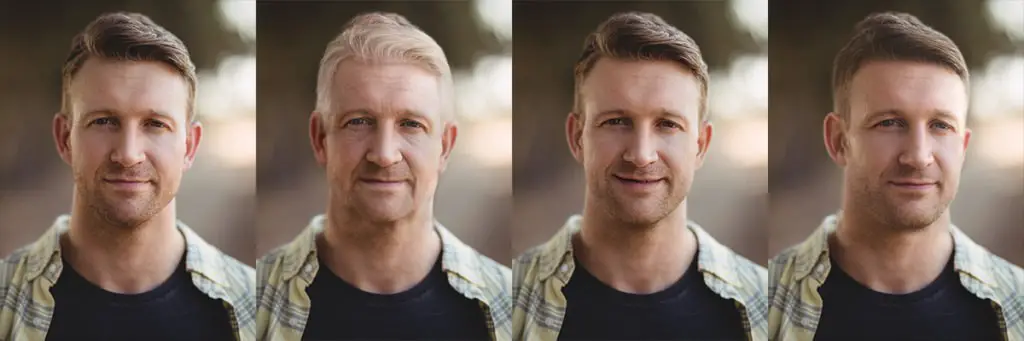
- Smart Portrait: This is one of the most powerful and potentially dangerous filters. It allows you to alter a subject’s features with sliders: change head direction, gaze, add or remove a smile, adjust facial age. For portrait photographers, this can be a lifesaver for fixing a shot where one person in a group isn’t looking at the camera. A subtle tweak to gaze can save an otherwise perfect image.
- Skin Smoothing: A quick and effective AI-based frequency separation. It intelligently blurs low-frequency color and tone while preserving high-frequency texture like pores and fine hairs. It’s a great starting point for retouching, but don’t expect it to replace manual, high-end skin work.
- Colorize: Have a project that involves restoring old family photos for a client? The Colorize filter does a remarkable job of adding realistic color to black-and-white images. It’s not perfect, but it can get you 90% of the way there in a single click.
Actionable Tips for Pros
- Always Output to a New Layer: This is non-negotiable. It allows you to mask the effect, lower its opacity, and blend it with your original image. FULL control is key.
- Less Is More: The sliders on these filters are powerful. Pushing them to 100 is a recipe for uncanny, plastic-looking results. Use them with subtlety. A little goes a long way.
- Process in the Cloud: Some of the more intensive filters require cloud processing. This is faster and gives you access to the most powerful models, so make sure you have a solid internet connection.
A Realistic Professional Workflow
So how does this all come together on a real project? Forget the one-click-and-done demos. Here’s a more realistic workflow for a commercial advertising image:
- Initial Composition: Start with your base photo from a RAW processor like Adobe Lightroom or Capture One. The client loves the shot of the model but needs it to be a 16:9 banner for their homepage. Use Generative Expand to extend the background to the required aspect ratio.
- Cleanup: There’s a distracting piece of trash on the ground and a logo on the model’s shoe that needs to be removed. Use Generative Fill on these small areas. No prompt needed; just let it generate a seamless patch.
- Creative Additions: The art director decides they want a “subtle, out-of-focus pot plant in the background on the left.” Make a loose selection in the area and use Generative Fill with that prompt to quickly add the element for approval.
- Initial Retouching: Use the Neural Filter: Skin Smoothing on a new layer at 30% opacity as a base for skin work. It evens out the major tonal variations, letting you focus on the finer details manually.
- Manual Mastery: Now, you step in. Dive deep with your existing skills. Use manual frequency separation, dodging and burning, color grading with Curves and Selective Color, and sharpening. The AI handled the heavy, time-consuming structural work, freeing you up to focus on the final 20%—the polish, the craft, the signature look that the client hired you for.
Limitations and Commercial Use
No tool is perfect. It’s critical to know the limitations.
- Resolution: Currently, the content generated by Firefly is capped at a certain resolution (around 1024×1024 pixels for a fill). If you’re working on a massive, high-res file for print, generating a large area might not hold up to scrutiny. It’s best used for smaller additions or on web-resolution files.
- The “AI Look”: Sometimes, generated content can look a little too perfect, a little too smooth. It can lack the natural chaos of a real photograph, a challenge that even powerful platforms detailed in this Midjourney for photographers guide must constantly navigate.
- Generative Credits: Adobe has implemented a system of “Generative Credits” for using Firefly features. You get a certain amount with your Creative Cloud plan, and they recharge monthly. For heavy users, this could become a factor.
- Hands and Faces: AI is notoriously bad at generating realistic hands and can sometimes struggle with faces in complex scenes. Always zoom in and inspect these critical areas.
The most important factor for professionals, however, is commercial safety. As mentioned, Firefly is designed to be commercially safe. This is a massive, defining advantage that puts Photoshop’s AI tools a serious consideration for anyone doing client work.
The Bottom Line
So, should you use Photoshop’s AI features?
The answer is an unequivocal YES. But not as a crutch or a replacement for your skills. Think of them as a force multiplier. These are tools that can collapse the most tedious, time-consuming parts of your workflow—extending backgrounds, removing distractions, mocking up ideas—from hours into minutes.
This doesn’t diminish your value; it amplifies it. It frees you from the drudgery of pixel-pushing and gives you more time and energy to focus on what truly matters: creative direction, color grading, storytelling, and client relationships. The AI provides the raw materials; you provide the vision and the craft. Your ability to direct, curate, and refine the output of these tools is the new skill, whether you’re using the integrated sliders in Photoshop or navigating a more complex, node-based system like ComfyUI. Master it, and you’ll not only stay relevant—you’ll be more in-demand than ever.


")
")

? The 100% honest review...")


")
