


I’ve always been a fan of photographic works by Andreas Gursky and others that are huge in scale and still maintain amazing detail. While Gursky is a living legend and none of us are approaching his sphere any time soon, there are a variety of more accessible approaches to creating massive images that maintain incredible details available to most of us
As such I want to take a second to introduce Ben Pitt. Ben is a tech / photo geek who has been reviewing digital things and software for more than 15 years – and as this post demonstrates – he knows a thing two about making these multi-gigapixel images with insane detail and will walk you though it in this post… Be sure to click on the link to this crazy 7-Gigapixel photo here (requires Flash) to get a sense for what I’m talking about. -Chase
________
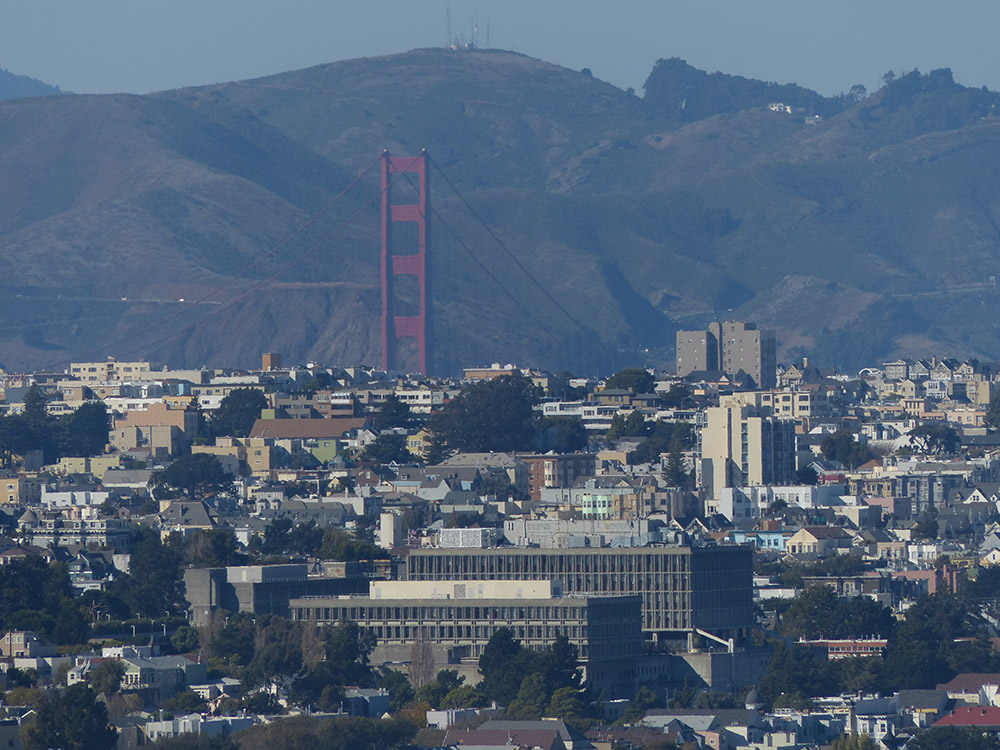
Thanks Chase. Modern digital cameras’ excessively high resolutions really bug me. Seriously, who needs more than 12 megapixels? (Don’t answer that.) So it’s ironic that I’ve recently caught a different kind of bug: creating gigapixel panoramas. It’s done by taking hundreds of photos and stitching them together on a computer. The image above weighs in at 7 gigapixels. Printed at 300dpi, it would be 61 feet wide.
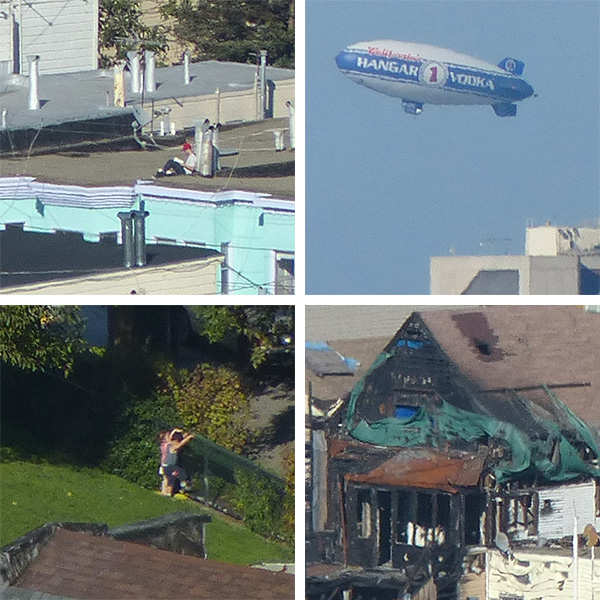
As Chase mentioned, take a second to check out the 7-gigapixel image at by clicking one of these links Gigapan (requires Flash), Gigapan for iPhone/iPad or Photosynth (requires Silverlight). Hit the Full-screen button and see if you can track down the four details below. Go on – zoom right all the way to the sidewalk where you can peep into the lives of millions of San Francisco locals going about their day.
Gigapixel panorama stitching is a stiff challenge for the computer, but the technique is surprisingly easy and the equipment needn’t be expensive. There’s some high-tech kits out there, such as the GigaPan robotic camera mounts, but my image was captured using a normal tripod and an inexpensive ultra-zoom camera I happened to have with me on my trip. A long telephoto lens is crucial, and the Panasonic FZ200 was perfect with its 600mm (equivalent) maximum focal length and crisp focus. I generally prefer to use an SLR or mirrorless camera but I love how versatile, compact and affordable these ultra-zoom cameras are.
Step 1: Shooting
First, shooting was pretty straightforward. I mounted the camera on the tripod, switched the exposure, focus and white balance to manual and zoomed in. All that remained was to zigzag across the scene, capturing it a row at a time with about 30 percent overlap to ensure an accurate stitch. I took 1,229 photos, captured in 16 rows of about 75 shots each. It took just over an hour. The weather in California is thankfully a little more stable than it is in my native England, so the light didn’t change much throughout the hour.
Step 2: Stitching
A week later I was back at my PC and finally able to stitch it together. I used a free Windows utility called Microsoft ICE (short for Image Composite Editor). The stitching process is entirely automatic – simply import the JPEGs and the software identifies common features in overlapping photos, adjusts each photo’s geometry as necessary and stitches them all together. It takes hours to process hundreds of photos but you can just leave the software to get on with it.

Photosynth for iPhone
Step 3: Troubleshooting
I’ve found that automatic panorama stitching is rarely faultless, and there were four areas where ICE ran into trouble in my San Francisco shot. I’d anticipated two of these – the sky and the hillside in the foreground – as I knew that there wouldn’t be enough detail in these areas for the software to identify common features in overlapping photos. I got around this by shooting the skyline again at 195mm, which gave me enough sky so that I didn’t have to crop Sutro Tower out of the shot. Zoom in and you’ll notice that the sky isn’t as sharp as the city, but it’s only really apparent in the aeroplane just above the blimp. For the foreground I stitched a dozen shots at 25mm. That’s far less detail than the rest of the image, but considering that the foreground is out of focus, the join is fairly imperceptible.
Step 4: Photoshop finishing
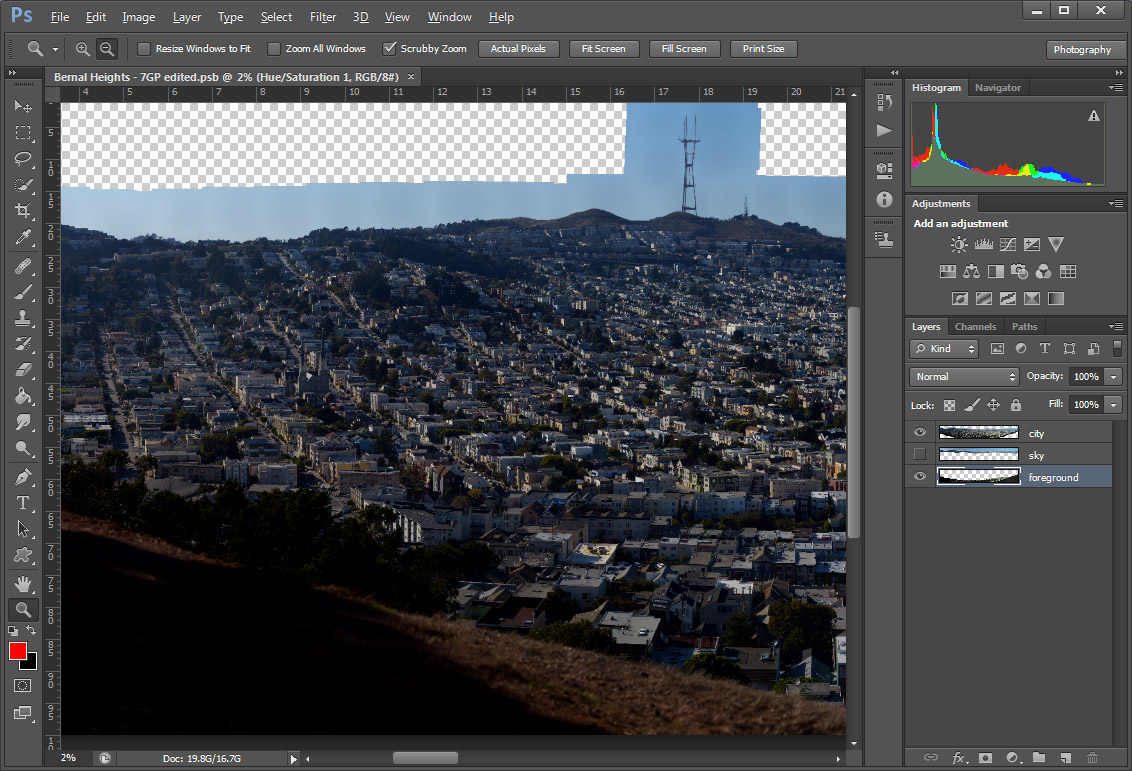
Next, I loaded these three stitches into Photoshop CS6, resized the smaller ones to match the biggest and blended them together. This is one job that’s not worth considering without Photoshop. I tried various editors to see how they’d cope with the 15GB PSB file, and Photoshop was the only one that stood a chance. If you don’t own it, bear in mind that you can now rent it for cheap.
The trees in the foreground confused ICE too because they were blowing in the wind, so I returned to the original photos to patch this area. There was also one small spot that I’d somehow completely missed, so I had to rebuild it with some Photoshop trickery – I owe a beer to the first person to find it.
Step 5: Sharing
Sharing – and even saving – gigapixel panoramas is another challenge. JPEG and TIF formats won’t go that high, so Photoshop’s PSB format is the only option I’ve found to save it to disk. The best way to view and share them is via online hosting sites. These work in a similar way to satellite mapping sites such as Google Maps, downloading small sections of the photo as they’re requested. I uploaded to Gigapan.com using its free uploader utility, and to Photosynth.net using a plug-in for Photoshop. You can also upload to Photosynth.net directly from Microsoft ICE.
There are some breathtaking panoramas on GigaPan, Photosynth and elsewhere – check out Martin Kulhavy’s work at www.martin.kulhavy.info, and this 30-gigapixel, 360-degree monster by Matt Uyttendaele, who happens to be the man behind ICE. These are the photographs that inspired me, and I’m happy to have produced something that – technically at least – is in the same league and yet was achieved with a cheap camera and basic tripod.
I love the fact that I created and published this image but I haven’t seen most of it. It’s a photo for exploring – finding the finer details. Like the man in the red cap reading a book on a roof, two toddlers planning their escape from a playground or the masses of street art that stretches across south San Francisco. There’s something satisfying about how this image is inquisitive but non-judgemental. From the fire-ravaged house façade to the man in the park with his tent, this is what San Francisco looked like on the 13th of October, 2012. I hope you find something interesting in there too. I hope you’re the man in the red cap, reading this now. Either way, If you’ve got a long lens and a couple of hours to spare, I’d love to see what’s happening in your neighborhood.


")


")


Of course, what a magnificent blog and revealing posts, I will bookmark your blog.All the Best!
Hair is a protein filament that grows from follicles found in the dermis, or skin. Hair is one of the defining characteristics of mammals.
you’re in point of fact a great webmaster. The internet internet site loading pace is incredible. It seems which you are performing any exclusive trick. Also, The contents are masterpiece. you’ve done a superb job in this subject!
Properly in the event you help make 2000 hyperlinks nevertheless do not get them re-indexed of course it certainly can’t indicate everything. Likewise but if your 2000 links tend to be total rubbish Yahoo and google may skip above all of them. They may investigate these individuals nevertheless may not index. We almost certainly invest concerning 15k hyperlinks to help my very own and ‘m nonetheless obtaining these listed. My tinyurl web page authority will be 76. Now this specific certainly won’t become a conclusion all possibly be just about all solution to growing within the search engine ranking positions. This is this push within the side you may want to obtain several power for most websites.
Well when you help to make 2000 backlinks nevertheless aren’t getting these people re-indexed certainly it won’t demonstrate anything at all. Additionally but if your 2000 back links are generally finish waste Yahoo will bypass in excess of all of them. They might get these people although would possibly not directory. My partner and i most likely devote in relation to 15k backlinks to quarry in addition to am even now having them listed. The tinyurl page power is actually seventy six. At this point this will not possibly be a stop most possibly be most approach to climbing within the search engines. This will be the particular drive in the border you may need to achieve some specialist for a lot of pages.