
Descript has been the industry standard for text-based video and audio editing for years. If you are still editing interview footage or podcasts by dragging waveforms around a timeline in Premiere or Audition, you are wasting time.
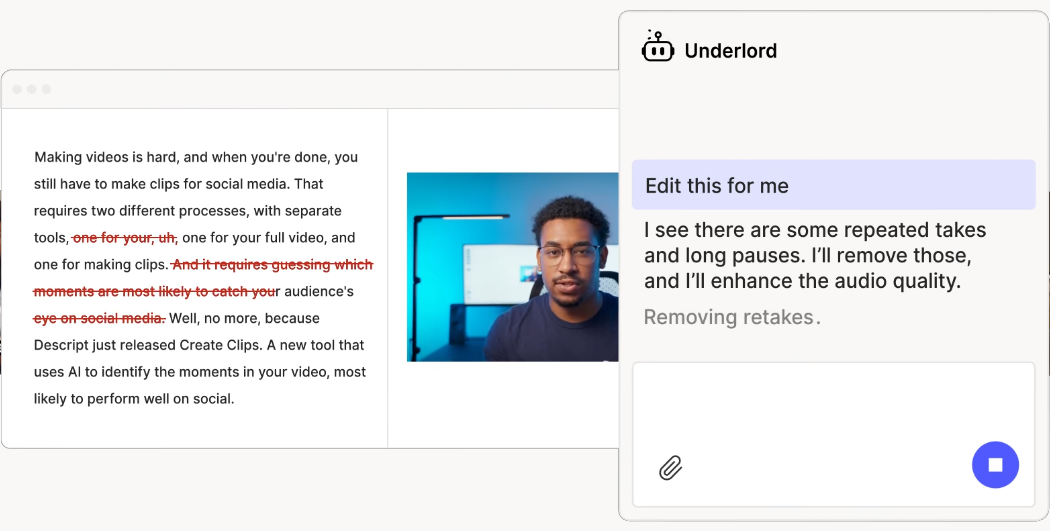
With the release of Underlord, Descript has shifted from a tool with some AI features to a platform built around an “agentic” AI assistant. This is not just a marketing rebrand. Underlord is a sidebar companion that acts as a junior editor. You give it instructions, it executes the tedious work, and you retain final creative control.
For creative professionals—editors, podcasters, and video strategists—this tool effectively eliminates the “rough cut” phase of production.
Here is exactly how it works, how to use it, and where the professional pitfalls are.
What Underlord Actually Is
Underlord is an AI assistant that lives in the sidebar of the Descript interface. Unlike previous iterations of AI tools where you had to hunt through menus to find “Studio Sound” or “Remove Filler Words,” Underlord centralizes these functions into a conversational interface.
It is “agentic,” meaning it has judgment. You don’t just click a button; you can tell it what you want. You can ask it to “Remove all retakes and tighten the pacing,” and it will identify where the speaker messed up, delete the bad take, keep the good one, and shorten the silence between thoughts.
It handles the three most time-consuming parts of editing:
- Cleanup: Removing “ums,” “uhs,” and bad takes.
- Enhancement: Fixing bad audio and correcting eye contact.
- Repurposing: Finding viral clips and drafting social posts.
The Pricing “Gotcha”: Media Minutes vs. AI Credits
Before you build your workflow around this, you need to understand the costs. Descript’s pricing model for Underlord has caused confusion because it splits usage into two different currencies: Media Minutes and AI Credits.
Media Minutes are for storage and transcription. When you upload a 60-minute video file or record strictly into the app, you use 60 Media Minutes. This is standard alone-time with the software.
AI Credits are for the “magic.” Every time you ask Underlord to do something—apply Studio Sound, remove filler words, or generate a social clip—it costs AI Credits.
The Professional Reality:
If you are running a production house or editing multiple podcasts a week, the base plans (Creator or Pro) might run out of AI Credits before Media Minutes. Monitor your credit usage in the settings panel. High-intensity tasks like “Studio Sound” (approx. 10 credits per use) and “Translate” (expensive) burn through your allowance faster than simple text edits.
Workflow: The Underlord “Rough Cut” Protocol
This is the standard operating procedure for turning raw footage into a polished edit using Underlord. Do not skip steps or change the order, or you will waste credits re-doing work.
Step 1: Transcribe and Identify Speakers
Drag your footage into Descript. Let it transcribe. Immediately use the “Identify Speakers” prompt to label the voices. Underlord uses these labels to make smarter cuts later.
Step 2: Audio Triage (Studio Sound)
Before you cut a single frame, fix the audio.
Open the Underlord sidebar and select Studio Sound. This uses regenerative AI to strip reverb and background noise.
Critical Setting: Do not leave this at the default 100% intensity.
- At 100%, it can sound robotic and clip the ends of words.
- Dial it down to 70-85%. This retains enough room tone to sound natural while removing the distracting noise.
Step 3: Remove Retakes (The Killer Feature)
This is where Underlord earns its keep. In a traditional workflow, you listen to a speaker stumble through a sentence three times before getting it right, and you manually cut the first two.
- Ask Underlord to “Remove Retakes.”
- It analyzes the transcript, finds the repeated failed attempts, and deletes them, leaving only the successful final take.
- Always review the cuts. Underlord is aggressive. It occasionally cuts a “retake” that was actually a deliberate repetition for emphasis.
Step 4: Delete Filler Words
Next, use the “Remove Filler Words” command.
- Pro Tip: Do not use “Delete from composition.” Use “Ignore” instead.
- “Ignore” strikes the text through (hiding the audio/video) but keeps the nondestructive file intact. If the edit creates a jump cut or ruins the cadence, you can bring the “um” back instantly by clicking the strikethrough text.
- Set it to remove “ums” and “uhs” but be careful with “like” and “you know.” Removing every single instance of these can make a speaker sound choppy and unnatural.

Step 5: Tighten the Pacing (Word Gaps)
Silence is dead air. Use the “Shorten Word Gaps” feature via Underlord.
- The Specific Setting: Set the threshold to 0.7 seconds.
- Anything longer than 0.7s feels like a mistake. Anything shorter is natural breathing room. Tells Underlord to shorten these gaps to 0.2s or 0.3s.
- This instantly drops a 60-minute interview down to 52 minutes of tight, engaging content.
Workflow: Generating Social Clips
Creative professionals leave money on the table by delivering a main asset without cut-downs. Underlord automates the search for “viral” moments.
- Open Underlord and type “Create Clips.”
- It will scan the transcript for high-energy segments, laughter, or self-contained stories.
- It generates distinct compositions for each clip, complete with captions.
The Warning: Underlord’s default visual prowess is limited. It often applies generic captions in the center of the screen.
- Do not use the default templates. They scream “AI generated.”
- Create your own branded templates in Descript’s “Templates” library first.
- After Underlord identifies the clips, manually apply your custom template to ensure brand consistency.
The “Hallucination” Risk:
Like all LLMs, Underlord can hallucinate content context. It might flag a section as “viral” because the keywords look exciting, even if the delivery is flat. You must watch every clip it generates. Do not auto-publish.
Advanced Features for Video Pros
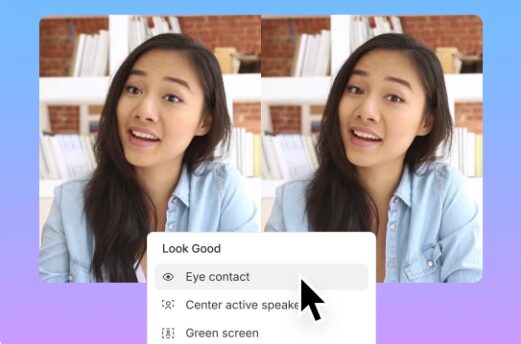
Eye Contact Correction
If your subject is reading a script or looking at a second monitor, use the Eye Contact feature in Underlord. It re-draws the pupils to look at the camera.
- Use Case: Only use this for straight-to-camera monologues (talking heads).
- Avoid: Do not use this on profile shots or interviews where two people are looking at each other. It looks terrifying if a guest suddenly stares down the barrel of the lens when they should be looking at the host.
Automatic Multicam
If you have a Zoom recording or two local files, Underlord can auto-edit the multicam.
- It analyzes the audio waveform to see who is speaking and switches the camera angle to them.
- Power Move: After the auto-pass, scroll through and manually add “Reaction” shots. Underlord defaults to showing the speaker 100% of the time. The emotion of an interview often lives in the reaction of the listener. You still need to add those cuts manually.
Conclusion
Descript Underlord is not a “make video” button. It is a “remove drudgery” button.
By handing off the audio repair, filler word removal, and rough cutting to the AI, you buy back 50% of your edit time. Use that time to focus on the pacing, the music cues, and the narrative arc—the creative decisions that a machine cannot make.
Charge your client the full rate. Deliver the work in half the time. That is how you build a sustainable creative career.


")

? The 100% honest review...")


")


