

Time is the only asset you cannot regenerate. As a creative professional—whether you are a videographer, a podcaster, or a digital marketer—your inventory is limited by how quickly you can execute on an idea. The friction between having a concept and delivering the final asset is where careers stall.
For decades, Non-Linear Editing systems (NLEs) like Adobe Premiere Pro, DaVinci Resolve, and Final Cut Pro have been the standard. They are powerful, precise, and dense. They require you to think in terms of timelines, keyframes, and waveforms. While necessary for high-end finishing, they are often overkill for the assembly phase of storytelling. They slow you down.
Descript changes the fundamental interaction model of video editing. It is a tool that creative professionals need to understand, not just as a novelty, but as a component of a high-efficiency workflow to stay competitive in a high-volume content landscape.
This analysis breaks down exactly how to use Descript video editor in a professional environment, where it replaces traditional tools, and where it acts as a force multiplier for your existing software.
Text-Based Editing Explained
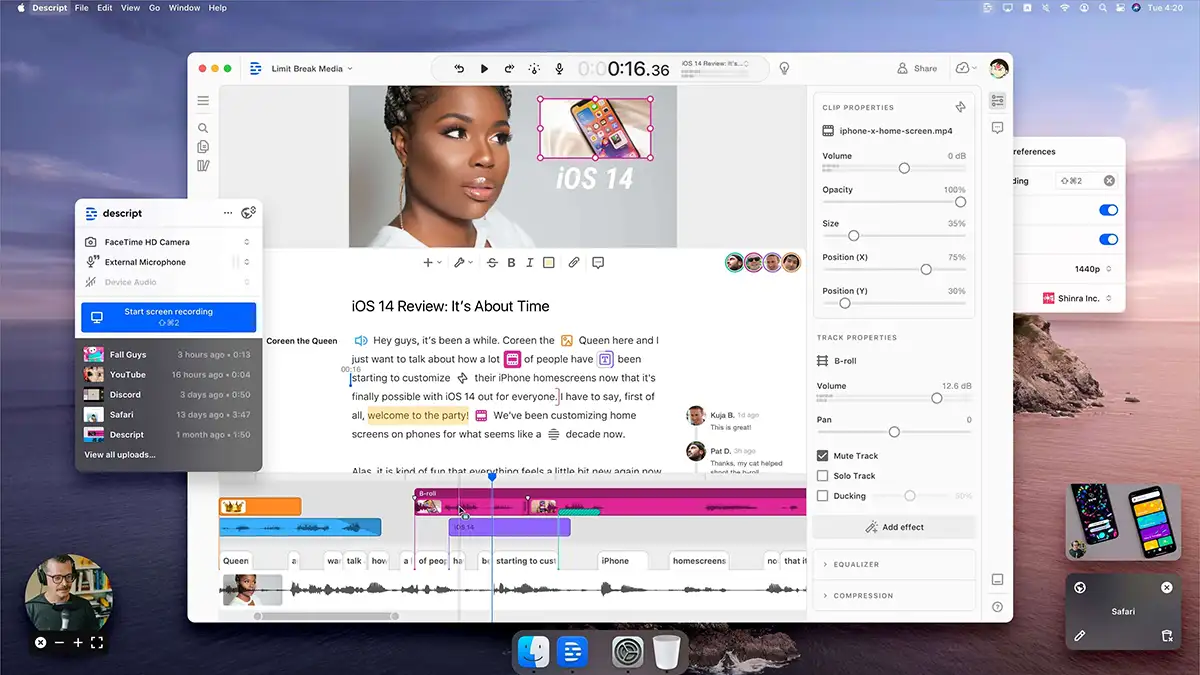
The core function of Descript is text-based editing. This is not a metaphor. The software transcribes your video or audio file upon import, and the resulting text document becomes the primary interface for editing.
When you delete a word in the text, Descript executes a ripple delete on the corresponding timeline validation. When you cut and paste a paragraph, the video clips reorder themselves to match. This removes the abstraction of waveforms. You do not hunt for the silence or the “um” by looking at audio peaks; you see the word “um” in the text and delete it.
For narrative construction, interview edits, and podcasting, this approach is significantly faster than scrubbing through a timeline. It allows you to edit for context and story flow immediately, rather than managing clip boundaries.

How The Engine Works
Descript aligns the timecode of the source media with the timestamps of the generated transcript. The software indexes every phoneme. When you manipulate the text, the software references the index and performs the corresponding operation on the underlying media file. It treats the video track, audio track, and transcript as a single, unified data object.
Setting Up Your Project Workflow
Efficiency requires a standardized setup. Do not approach Descript haphazardly. Treat it with the same rigorous file management you use in Resolve or Premiere.
Import and Transcription
When you drag footage into Descript, the transcription engine engages immediately. You have options here regarding accuracy and speaker detection.
- Speaker Detection: Always enable this for multi-cam or interview setups. Assign names immediately upon import (e.g., “Interviewer,” “Subject”). This assists in automated switching later.
- Language Support: Ensure the correct language is selected if you are working with international clients. The transcription accuracy is high, generally hovering around 95% for clear audio, but proper language tags reduce error rates.
The Script View vs. The Timeline View
Descript offers a split interface. The top or left pane (depending on your workspace configuration) allows you to see the script. The bottom pane reveals a traditional timeline layer.
- Pro Tip: Use the timeline view (
Shift + Cmd + Oon Mac) primarily for J-cuts and L-cuts. While the text editor handles the narrative flow, the timeline is necessary to drag audio boundaries so the sound of the next scene precedes the visual, smoothing the transition.
Audio Engineering with Studio Sound
Audio quality separates amateurs from professionals. Clients will forgive grainy 1080p footage; they will not forgive bad audio. Descript includes a feature called Studio Sound, which uses regenerative algorithms to restore voice quality.
This works differently than a standard noise gate or EQ filter found in Audition. Studio Sound isolates the speech frequencies and then uses AI to regenerate missing high-frequency data and harmonics that were lost due to compression or poor recording environments. It effectively eliminates room echo and background noise.
Dialing in Studio Sound
Do not simply flip the switch and leave it at 100%. At maximum intensity, the algorithm can sound artificial or “gated,” stripping away too much natural breath and room tone, making the speaker sound like a synthesizer.
- Apply Studio Sound from the Audio Effects panel.
- Wait for the processing to complete.
- Locate the intensity dial (default is 100%).
- Actionable Setting: Reduce intensity to 60% – 75%. This retains enough of the organic recording to sound human while removing the distracting noise floor and echo.
Overdub and AI Voice Generation
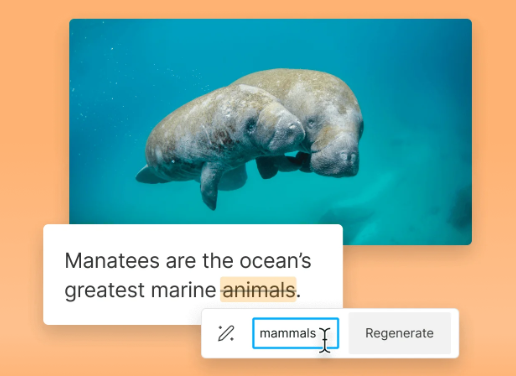
Reshoots are expensive. Re-recording Voice Overs (VO) because of a mispronounced name or a changed date destroys profit margins. Descript’s Overdub feature addresses this by allowing you to generate synthetic speech that mimics your voice or your talent’s voice (with consent).
You train the AI by reading a script for approximately 10 to 30 minutes. Once the voice model is created, you can correct a word in the text editor by typing the new word. Descript generates the audio for that new word in the speaker’s voice.
Best Practices for Overdub
- Mid-sentence corrections: Overdub works best for single words or short phrases within a sentence. The AI matches the cadence and intonation of the surrounding audio.
- Scratch tracks: Use generic stock voices for scratch VO to establish timing for a client draft before paying a voice actor for the final read.
Video clean up and Visual Editing
While audio is Descript’s heritage, its video capabilities have matured to the point where full edits can be completed inside the application.
Word Gap Removal
In a traditional NLE, removing silence requires analyzing the waveform, cutting, and ripple deleting. In Descript, this is automated.
- Navigate to the “Remove Filler Words” or “Shorten Gaps” action bar.
- Set the threshold (e.g., gaps longer than 0.7 seconds).
- Apply “Shorten to 0.2 seconds.”
This tightens the pacing of an interview instantly. It creates a jump-cut aesthetic. If you need to hide the jump cuts, you apply B-roll or use the Morph Cut transition, though B-roll is the professional standard.
Eye Contact Correction
Creative professionals often deal with subjects who read from a teleprompter or look at the interviewer rather than the lens. The Eye Contact AI feature shifts the iris of the subject to look directly into the camera.
- Usage: Use this sparingly. It is effective for social media clips where engagement is driven by direct address. It can appear uncanny in long-form cinematic documentary work.
Green Screen and Background Removal
Descript utilizes machine learning to perform rotoscoping without a chroma key green screen. You can apply the Green Screen effect to any footage. The software identifies the subject and generates an alpha channel for the background.
- Actionable Advice: This feature is processor-intensive. If you are working on a laptop, apply this effect last, right before export, to maintain playback performance during the edit.
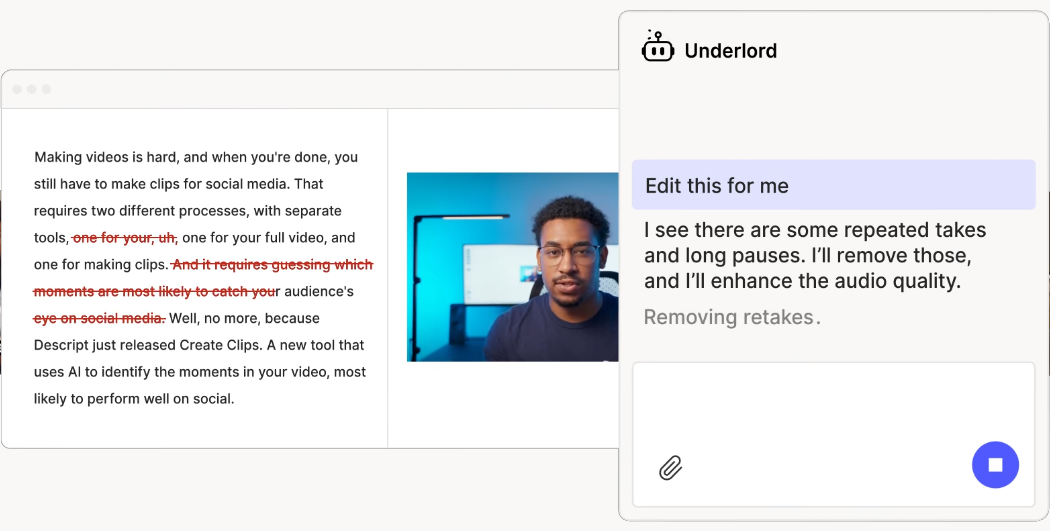
Underlord: The AI Assistant
Descript recently introduced an AI assistant dubbed Underlord. Much like the broader trend of creative pros using ChatGPT to streamline work, this is not a generative toy; it is a workflow accelerator. It handles the tedious metadata and summary tasks that creatives often neglect.
Automatic Show Notes and Youtube Descriptions
You can ask Underlord to scan the project and generate:
- YouTube chapters with accurate timestamps.
- SEO-optimized titles.
- Summaries for podcast show notes.
- Social media captions.
This creates value for your clients. You are not just delivering a video file; you are delivering the metadata required to publish it successfully.
Highlight Generation
For long-form content, Underlord can identify “viral moments” or high-engagement sections. It extracts these clips, reformats them to 9:16 (vertical), and adds captions automatically. This allows you to upsell a client: “I will deliver the 40-minute keynote, plus five short-form clips for Instagram Reels.”
The Professional Hybrid Workflow (The Round Trip)
Many experienced editors hesitate to leave Adobe Premiere Pro or DaVinci Resolve because Descript lacks advanced color grading, complex audio mixing (5.1 surround), and heavy motion graphics capabilities.
The solution is the Round Trip Workflow. You do not have to choose one or the other. You use the best tool for the specific phase of the project.
Phase 1: Assembly in Descript
Import raw footage into Descript. Use text-based editing to select the best takes, remove the fluff, tighten the pacing, and build the narrative structure. This is significantly faster in Descript because you are editing the story, not the file.
Phase 2: Export to NLE
Once the “picture lock” or narrative structure is approved, do not export a video file. Export an XML or EDL file.
- Click Publish -> Export.
- Select Timeline.
- Choose Final Cut Pro XML (for FCP) or Premiere Pro XML.
- If using DaVinci Resolve, the FCP7 XML standard is usually the most compatible import method.
Phase 3: Finishing in Default NLE
Open Premiere or Resolve. Import the XML. Your timeline re-assembles exactly as you cut it in Descript, with all cuts and timing preserved. Now you have the raw files linked.
- Perform Color Grading in Resolve.
- Add complex Motion Graphics in After Effects.
- Finalize the Audio Mix.
This hybrid approach leverages Descript’s speed for the “slog” of editing and the NLE’s power for the polish.
Social Media Content at Scale
The modern creative professional is often asked to produce “content,” which implies volume. Descript excels here.
Templates and Layouts
You can build custom visual templates that maintain brand consistency. If a client has specific fonts, colors, and logo placements, you build this into a Scene template.
- Apply the template to a clip.
- The captions automatically adopt the brand font.
- The background changes to the brand hex code.
- The watermark appears in the corner.
Aspect Ratio Switching
You can duplicate a composition (e.g., a 16:9 YouTube video) and change the aspect ratio to 9:16 for platforms like TikTok. Understanding how TikTok works for creative pros can make this feature even more powerful. Descript’s “Auto-Level” logic attempts to keep the speaker in the center of the frame. You will need to make minor adjustments, but the reformatting process is largely automated.
Deliverables and Collaboration
Client feedback is the bottleneck of most creative projects. Descript operates in the cloud (with local syncing), allowing for browser-based review links.
The Feedback Loop
Send a web link to the client. They do not need a Descript account to view. They can highlight a section of the text or the video and leave a comment.
- These comments appear directly in your project file.
- You can check them off as you address them.
- This eliminates the “email timecode” dance (“can you change the shot at 01:04:32?”).
Pricing and Value Assessment
As of this writing, Descript operates on a subscription model.
- Creator Tier: Sufficient for solopreneurs doing 1-2 videos a month.
- Pro Tier: The necessary standard for working professionals. It unlocks unlimited Studio Sound, filler word removal, and higher resolution exports (4K).
- Enterprise: For large agencies requiring SSO and advanced data security.
Is It Worth The Cost?
Calculate your hourly rate. If you charge $100/hour, and Descript saves you five hours of transcription, rough cutting, and silence removal per project, the monthly subscription pays for itself in the first half of the first project. The ROI is immediate for anyone handling dialogue-heavy video.
Technical Limitations (The Reality Check)
Descript is not perfect. You need to be aware of where it breaks to avoid embarrassment.
- Heavy Compositing: If you need to layer five video tracks with transfer modes and alpha mattes, Descript will struggle. Use After Effects.
- High-End Color: The color correction tools are basic (exposure, contrast, saturation). It does not support LUTs in a complex node structure like Resolve.
- Large File Management: While improved, extremely large projects (feature-length docs with terabytes of raw 8K footage) can experience latency. In these cases, use proxies or stick to the NLE for the heavy lifting.
Conclusion: Adapt or Fade Away
The marketplace does not reward you for doing things the hard way. It rewards you for the impact of your work and the speed at which you can deliver it. Tools like Descript, and others like Higgsfield for generative video, aren’t just “another tool;” they represent a shift in how we process video data.
Using text-based editing allows you to focus on the story rather than the technical minutiae of the timeline. Using AI audio repair allows you to salvage bad takes. Using the hybrid workflow allows you to integrate this speed into your high-end delivery pipeline.
Stop taking pride in the hours you waste scrubbing through timelines. Master the tools that give you your time back. Download Descript, put it into your pipeline on the next job, and see the difference in your throughput. The standard has moved. Move with it.


")


")


