 Problem: I think a lot of photographers (myself included at some point in the past) pour too much strobed light into an image out of technical misunderstandings rather than stylistic choice. Under-exposing 2 stops and then popping your subject from 5 feet away with a direct shot from your strobe is certainly a style, but unless it’s done deliberately as a style, it often distracts the viewer from the image rather than adding to it. I’d say it’s the most common mistake that plagues photographers new to off-camera strobes: just because some is good, it doesn’t mean more is better.
Solution: I’d encourage you to think of artificial light in a photo more like good service at a restaurant: it’s often best when it’s there, but you don’t notice it at all. Thus, enter what I’d call subtle light. And the beauty of making subtle light is that it doesn’t have to be difficult. In fact, most shooters I know over-think it. At it’s root, it’s really about just a few things: your ambient exposure, bouncing and/or diffusing light.
Balancing your strobes with the ambient exposure (the natural exposure of the light in the room/location) is the first key. Simply put, if your goal is to make some subtle light you shouldn’t really be able to “see” that light source. And if you’re subtle light is adding to light already in a scene, you shouldn’t be able to see a difference between the value (brightness) of the light that’s already in the scene with the light that you’re bringing in.
To illustrate this concept, I’ll use the really simple editorial-feeling image atop the page that I shot just a couple weeks ago…[click the ‘continue reading’ link below – more pics, lighting diagrams after the jump…] —
…as an example.
First, I set the exposure to get a nice bright, natural feel out of the windows behind my subjects. My next goal is then to match that exposure gently with the lights that I’ve brought with me. A mistake would be to blast model Rusty’s eyeballs outta his head with 1200 watt seconds of flame-thrower-bare-naked-flashtube aimed right at him, revealing all my artificial light. Instead, the AD and I agreed that a simple, more subtle light–one that looked like it was from big set of wrap-around windows, with a similar light value to what’s happening outside–would be the ticket to drop into this scene and brighten our happy travelers. Nothing extraordinary, just something that looked natural.
The most common way to make a big, soft, artificial light is to have a big, soft source…a 12’x12′ silk that you can shoot a bunch of light through, a big 8-foot wide Para umbrella, or similar. The only problem with this is that we photographers quite commonly find ourselves in need of such things, but without them (through lack of planning, laziness, or needing to stay light and fast…). Enter stage left, the secret weapon of any good photographer: the ability to think on your feet…which is exactly what I did when I found myself in Colorado on this particular day in a mostly dark room, sans 12 foot silk, without giant umbrella, but with my trusty 1200 w/s battery powered strobe kit.
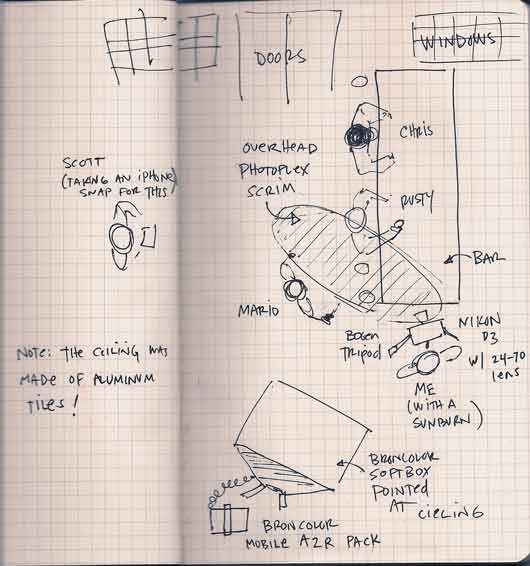
First, the bounce. In order to make the light falling on this scene seem like it was from a big wrapping set of windows, I wanted to create the biggest light source I could – something much larger than the 2’x3’ softbox that I had with me. And so I created that source by bouncing light from a single head fired off my 1200w/s Broncolor Mobile kit right off the 14-foot ceiling. Like magic it turned my 2’x3′ softbox into a 20 foot wide source of light just by firing it at the ceiling. (Note: the deed was further amplified by the fact that the ceiling was made up of reflective metallic tiles – keep your eyes peeled for such things that can play in your favor).
I was instantly in a much better place. Once I got the “right” amount of light coming outta the gear and bouncing around–actually the right amount for the dark wood all over the bar, and for the other model, Chris’ dark skin color–I noticed that Rusty was getting overpowered. His red jacket and fair skin needed less light.
Enter subtle light technique #2: Diffuse. Diffusion can look like a lot of different things. You can shoot light thru a milk carton, a sheet, a silk, some clouds, whatever. The principles are all the same. Your goal is to knock down light pouring on the subject. Since we had the entire scene looking good with light except for our featured talent, pulled back the light falling on Rusty using the one partially opaque thing we had on hand – my PhotoFlex Translucent Lite Disc. My second assistant, Mario, simply held that disc between Rusty and the lit-up ceiling, and we nailed it. You’re no doubt picking up what I’m putting down: subtle light is about adding light gently (big light source, bounced, etc) and take it away in the same manner (diffusing hard light with scrims and silks).
Here’s the top view, sketched out:

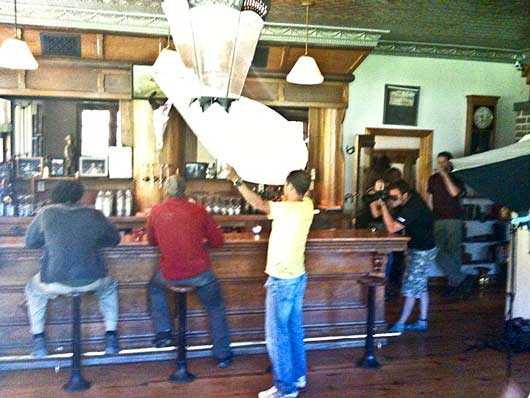
And here’s a shot that Scott snapped with his iphone to illustrate what’s going on from the side. Note that I drew in a tripod on my sketch. This image was snapped moments after deciding not to use the tripod so I could tweak my camera angles a little more freely…

Now, as we’ve said before, there’s a million ways to skin a cat. Because of the limited amount of gear I had with me, I chose to light the whole room for the darkest bits and then scale back the things that were a little to hot with some additional diffusion. I could have done just the opposite–lit the overall room for the base value I wanted and then brought in additional light on the dark bits with some more light, but given the lack of gear I had because we were in a pretty remote location, I chose the latter. It worked in my favor here.
The long and short is that we ended up getting the subtly lit shot we were looking for, with keeping just a few simple things in mind: exposure, bounce, diffuse. Whether it’s with specialty light modifiers, or with do-it-yourself stuff, dialing in your ability to partially- and subtly light your subjects will drastically help your photography.
[A vid of the gear we had in the back of the truck with us on this shoot can be found on my Facebook Fan Page. Become a Fan if you’d like to check it out.]—
Get my every move: Follow Chase Jarvis on Twitter
Get exclusive content: Become a Fan on Facebook


Wished to drop a comment and let you know your Feed will not be working today. Cleaning it once a including it to my Bing reader account and got next to nothing.
Hey there, You have performed a great job. I will definitely digg it and in my opinion suggest to my friends. I am sure they’ll be benefited from this web site.
great information. Thanks for sharing this with us. I like the skin mousturizer 7.5. But I do think the .04 would work better. Anyway great work!
There are some interesting points in time on this article however I don’t know if I see all of them middle to heart. There’s some validity but I’ll take hold opinion until I look into it further. Good article , thanks and we would like extra! Added to FeedBurner as well