 It’s been gratifying to see that the great preset debate from my earlier post is not isolated to this office, instead there seems to be a lot of interest in this topic and a fairly even split in favor of and against using adjustment presets. The majority of comments landed somewhere in the neighborhood of “I use them in moderation in order to get initial settings or ideas, then custom tweak from there.”
This is not a bad place to be. And yet, my presets sit to the side of my toolbar gathering dust 99% of the time.
Why? I’m constantly amazed at the extent to which each and every photograph is an individual. A small wiggle of the lights, camera, clouds, sun, model; any of it can change an image materially. This doesn’t just apply to the technical values of the image, it also applies to the mood and aesthetic essence.
It is this aesthetic essence that I try to ‘read’ when I start post production on an image. Does this feel like a dark or light image? Is it punchy and loud, or quiet and subtle? Does the color add value or create a distraction? I find that the images have some capacity to direct me in my approach.
How does this ‘approach’ translate to real action? Here are the steps with which I approach a new collection of images that come across my desk:
- Edit. I don’t want to be distracted by volume when retouching. I only want to spend cycles working on images that are fundamentally good. To that end, I complete an edit before any retouching begins. For more on this topic, take a peek at this post on my editing process.
- Start Playing. After the edit I spin through the selects, somewhat aimlessly at first. I might select a certain image that grabs my fancy, pull the exposure or white balance around a bit, yank another couple of sliders around. Maybe I get engaged at this point and start a full process with this image, maybe I leave it totally unfinished and move along to play with another select. Eventually I stumble upon an image that starts to take shape and piques my interest.
- Dig Deeper. This is where a sort of conversation takes place between me and the image. At the risk of sounding like a total dork, it’s kind of like the first dance with a new partner. There is a give and take – a push and pull. On one hand I’m controlling the look of the image, on the other hand it’s letting me know what it wants to look like. I’ve seen images that look horrible in color and brilliant in black and white, I’ve seen images that are noisy and cluttered when properly exposed, but simple and refined when blown out. Definition and clarity can make an image crisp, or can produce devastating halos that scream ‘overprocessed’. I’ve found that the only way to really understand an image’s potential and limitations is to experiment and follow your gut. It is my firm belief that using presets at this stage has the unintended side effect of actually limiting creativity and experimentation when they’re intended to do the opposite.
- Spread the Love. Once the image that has grabbed me initially has had a significant initial work up, it’s time to see if the aesthetic works with it’s neighbors. While I avoid presets like the plague during my initial experimentations, I have no problem applying the adjustments I’ve made to the first image to the rest of the collection. This is sort of a hail mary play. Sometimes it’s an acute failure; the image I worked up initially is an anomaly and it’s optimal settings are pure poison on the next frame in the edit. On the other hand, sometimes there is enough similarity between the images that this Lift/Stamp move across the whole shoot delivers ‘instant gold’. Usually, it’s somewhere in between, i.e. the few surrounding images from the exact same scenario sync well, where the ones that are a few hours apart need to be reworked entirely.
- Rebuild or Fine Tune. Depending on how well the Lift/Stamp worked, it’s time to either undo the Stamp and start fresh on a second image, or in the best case scenario all that’s required is some tweaking to the individual images.
- Export. At this point there are a pile of selected images that share a similar look and feel and that have each received some individual love in the RAW processing. If there is a client review to be done, we’ll create a web gallery or send over preview files. If we’ve got to go crazy on a small volume of advertising images it’s time to get into Photoshop and make magic.
Lest this all be too simple, I should share two exceptions to this workflow.
Ongoing Projects. Chase shot for almost three years to complete the Seattle 100 project. By the second month of shooting we had perfected the shooting and retouching. The lights were set up the exact same way each time we shot. The camera settings were always the same. The high contrast black and white aesthetic was established and fine tuned. All we had to do was repeat until we had shot all 100 subjects. In this instance we relied heavily on our custom preset during the initial broad retouch of images for the web. The images that went in the book were each custom retouched in Photoshop.
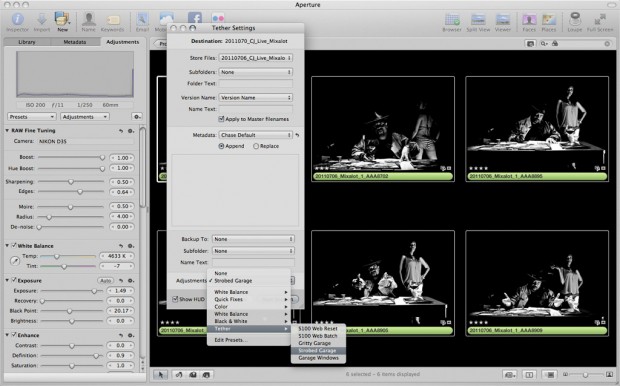
Shooting Tethered. Almost all of our tethered shooting sessions are set up for the benefit of the client or subject. It’s a way to instantly share what’s being captured so that tweaks can be made to the shoot in real time. While Chase and I are both able to envision what a RAW image can look like of with some post work, often the clients or subjects are not trained to do the same. To this end, Chase and I will generally collaborate on a rough post production aesthetic at the same time we’re setting up the lighting and getting test shots at the beginning of the shoot. We’ll then use Aperture’s ability to apply presets while importing tethered shots. That way, the images already look close to what we’re trying to achieve the second they show up on the monitor. This makes the clients and talent happy.
The important takeaway is that each shoot is approached with a fresh set of tools. Just as it’s often more effective to build a house from the ground up than to do a full remodel, I find that it’s more effective to invest more time on the front end of the post production process in order to generate a custom look tailored to the collection than it is to drop presets on the images, and then have to dig around to figure out what’s doing good and what’s doing harm.
If these methods makes sense for you, feel free to adopt them. If you have developed a workflow that utilizes presets more heavily than ours, by all means, do your thing. The true beauty of the proliferation of digital imaging technology is that it gives people an ever increasing set of tools for creative expression. Heck, a couple months down the road you just might find me extolling the virtues of a great Aperture preset I just found online. The only constant in this landscape is change. Experiment, have fun, and make things that you find to be beautiful.


hey, stupid question but how do i receive the fresh hydrocollide recipes to print or even up about screen?
This is a good tip especially to those fresh to the blogosphere. Brief but very accurate information… Thanks for sharing this one. A must read post! http://senswith.blogspot.com
http://www.chelseaonthemarket.co.uk
Thanks for sharing such a pleasant thought, post is nice, thats why i have read it completely
Hello there! I could have sworn I’ve visited your blog before but after browsing through a few of the articles I realized it’s new to me. Nonetheless, I’m certainly pleased I stumbled upon it and I’ll be bookmarking it and checking back regularly!