
You are tired of the “prompt and pray” method of AI generation. You type a paragraph, hit generate, wait thirty seconds, and get something that looks nothing like your vision. You tweak one word, wait another thirty seconds, and it’s worse.
This creates friction. It kills flow. Professional creativity relies on iteration speed—the ability to see a mistake and correct it instantly.
![]()
Krea AI changes this dynamic. It is currently the most robust tool for real-time generative feedback. It separates itself from competitors like Midjourney or DALL-E 3 by focusing on interactivity and control rather than just high-fidelity “one-shot” generation.
If you are a photographer, designer, or motion artist, you need to understand how this tool fits into your pipeline. It is not just a toy. It is a visualization engine that can save you hours of concepting time if you know how to use it.
What Exactly Is Krea AI
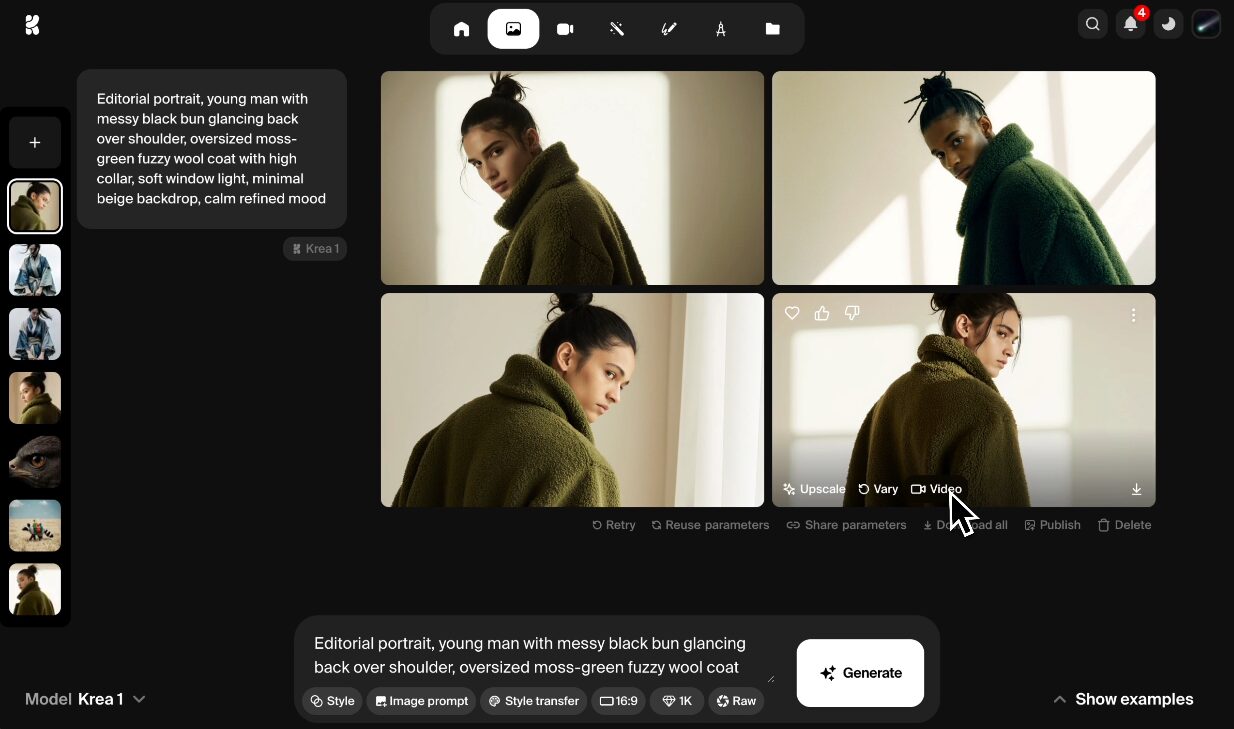
Krea AI is a generative AI platform built for speed and control. While other tools focus on generating a single, perfect image from a text prompt, Krea focuses on real-time generation.
Its flagship feature allows you to draw shapes on a canvas (or feed it a webcam input) and see a high-fidelity AI interpretation of that input instantly on the right side of the screen. As you move your brush or change a slider, the image updates in milliseconds.
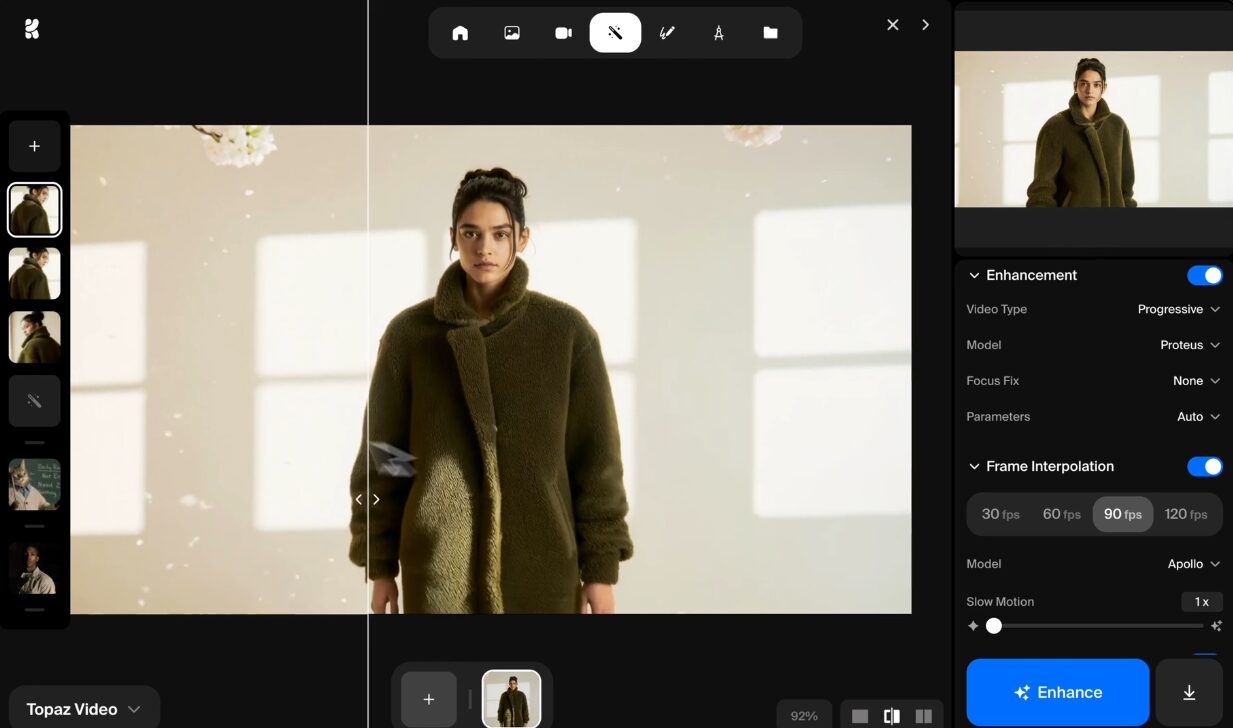
It also offers a suite of enhancement tools. This includes an upscaler that doesn’t just sharpen pixels but hallucinates detail where there was none, and a video generation tool that offers significant control over motion via keyframes.
For the creative professional, Krea is less of a “magic button” and more of a “co-pilot” that sits between your manual input (sketching, photos) and the final rendered output.
How Creative Professionals Can Use Krea AI
You do not need another tool to generate random stock photos. You need tools that solve specific production problems. Krea AI excels in three specific areas: rapid concepting, asset restoration, and video storyboarding.
I will break down exactly how you can deploy these features in a professional workflow.
The Real-Time Designer Workflow
The most powerful feature in Krea is the specific “Real-time Generation” interface. This allows you to sketch on the left and see the result on the right.
The Setup
Use a drawing tablet. A Wacom Intuos or a mapped iPad using Sidecar is essential here. Mouse drawing is too clumsy for professional work.
- Open the Krea Real-time canvas.
- Set your screen configuration so your drawing area corresponds to the input box.
- Enter a broad prompt in the text field. For example: “Cinematic architecture, brutalist concrete structure, soft lighting, 8k.”
- Begin sketching simple block shapes on the left canvas.
The Workflow
As you draw a gray box, Krea interprets it as a concrete building instantly. If you erase a corner, the building updates. This allows you to “sculpt” the composition. You are not fighting the AI for composition control; you are dictating it with your hand.

Pro Tip for Composition: Use the “AI Strength” slider. This is the most critical setting in Krea.
- Low Strength (0.3 – 0.5): The AI adheres strictly to your lines. It will look like a sketch with some texture applied.
- High Strength (0.7 – 0.9): The AI takes liberties. It will turn your sloppy circle into a perfect geodesic dome.
- Sweet Spot: Keep it around 0.65 for concept art. This keeps your composition but adds professional rendering.
Application: Use this for client mood boards. Instead of spending four hours searching Pinterest for “brutalism,” sketch the exact layout the client needs and generate ten variations in three minutes.
Upscaling and Restoration for Photographers
Most “upscalers” in software like Photoshop or Topaz interact with pixels. They try to sharpen edges. Krea’s Enhancer is a generative upscaler. It analyzes the image, understands what the object should be, and generates new pixel data to match.
When to Use It
- Client Assets: Clients frequently send low-resolution logos or photos they “pulled from the web” (72dpi, 500px wide) and expect you to use them on a print poster.
- AI Cleaning: Images from Midjourney often have strange artifacts—perfect faces but messy textures on clothes or skin.
Specific Settings for Upscaling
- Navigate to the “Enhance” tab.
- Upload your source image.
- Upscale Factor: Choose 2x or 4x. Be careful with 4x on faces; it can sometimes “over-smooth” skin texture, making it look plastic.
- AI Strength (Again): This is crucial.
- Set this to low (around 0.2) if you want to preserve the exact likeness of a person.
- Set this to high (0.5+) if you are upscaling a texture or a background element where you want the AI to invent new detail, like fabric weave or brick texture.
- Prompting the Upscale: unlike standard upscalers, you can describe the image during the upscale. If you are upscaling a photo of a leather jacket, add “black leather texture, high detail” in the prompt box. Krea will use that text data to guide the texture generation.
Video Storyboarding and Motion
Krea’s video features are not ready for a final Super Bowl commercial, but they are incredible for pitch decks and storyboards. The tool allows for Keyframe Animation.
The Problem It Solves
Transmitting motion ideas to clients is difficult. Static storyboards often fail to convey the “vibe” of a transition.
The Workflow
- Create two images (or generate them). Let’s say Image A is a wide shot of a city, and Image B is a close-up of a specific street corner.
- Enter the Krea Video generator.
- Upload Image A as the start frame and Image B as the end frame.
- Duration: Set this between 3 to 5 seconds. Longer clips often degrade in coherence.
- Motion Strength: Keep this moderate. Too high, and the morph will look like a fever dream.
Result: Krea generates the “tween” frames between these two states. You get a video file showing a camera movement from wide to tight. You can export this as an MP4 and drop it directly into a Premiere or DaVinci Resolve timeline as a placeholder to show the editor or director the intended camera move.
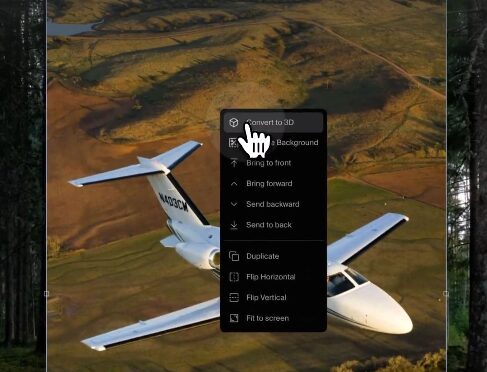
Pattern Design with Logo Illusions
For graphic designers working on branding, the “Logo Illusions” (sometimes called AI Patterns) feature is a high-value tool. It allows you to hide a vector logo inside a photographic scene.
How to Execute
- Upload a high-contrast, black-and-white logo (PNG format with transparency works best).
- Type a prompt for the scene: “Aerial view of a snowy mountain range.”
- Pattern Strength: This controls how visible the logo is.
- High: The mountains look exactly like the logo. It is obvious and cheesy.
- Low: The logo is subliminal. You only see it if you squint.
- Use Case: This is powerful for social media campaigns or “easter egg” content for brands. It generates high engagement because it forces the viewer to pause and analyze the image.
![]()
Advanced Technical Considerations
As a professional, you need to know the limits of your gear. Here are the technical constraints of Krea as of late 2024/early 2025.
Resolution and Export
- Real-time Generation: These often export at lower resolutions initially (around 1024×1024 or similar aspect ratios). You must run them through the Enhancer tool if you plan to use them in final print work or high-res digital displays.
- Video Limits: Clips are short. Usually 5 to 10 seconds. Do not expect to generate a minute-long scene. You will need to stitch multiple clips together in post-production.
- File Formats: Standard exports are JPG/PNG for images and MP4 for video. There is no raw functionality here. You are getting baked pixel data.
iPad and Mobile Workflow
There is a Krea app, and it supports the Apple Pencil. However, the browser-based version on a desktop with a drawing tablet often provides a more stable, higher-bandwidth experience for heavy “Real-time” usage.
- The Lag Factor: Real-time generation requires massive server-side compute. If your internet connection is unstable, the “real-time” aspect lags. For the best experience, use a weird connection (Ethernet) on your desktop workstation. If you are on an iPad, ensure you are on high-speed Wi-Fi.
Pattern Tool LatencyGenerating high-quality patterns is computationally expensive. It is not as “instant” as the sketch-to-image feature. Plan for 10-20 seconds of render time per variation.
Is Krea AI Right for You?
Krea AI is a tool for doers, not just prompt engineers.
You should use Krea AI if:
- You can draw (even badly): The real-time sketch workflow rewards those who understand composition and lighting, even if your drafting skills are rudimentary.
- You need speed: You work in advertising, concept art, or pitch deck creation where getting 20 variations in an hour is more important than one perfect painting in a week.
- You work with bad client assets: The Enhancer/Upscaler alone is worth the price of admission for professionals constantly fixing low-res junk sent by clients.
You should skip Krea AI if:
- You demand perfect text rendering: If you need AI to render perfect typography on a sign, specialized tools (or just doing it in Photoshop) are still better.
- You have zero visual sense: If you cannot sketch a basic layout to guide the AI, you will find the blank canvas intimidating compared to a simple text prompt box.
The Bottom Line
Krea AI restores agency to the creative. It moves AI generation away from a slot machine mechanic and turns it into a paintbrush. For the experienced professional, that control is the difference between a toy and a tool.
Go to krea.ai. Sign up for the free tier to test the latency on your connection. If it fits your workflow, the Pro subscription is a negligible expense compared to the billable hours it saves in the concepting phase.
Get to work.
Detailed Tutorials for Specific Workflows
Since you need to master this tool, I am going to go deeper into the specific button-clicks and settings for the three most common professional use cases. Do not skim this.
1. The Low-Fidelity Sketch to High-Fidelity Concept
This is the “killer app” for Krea. Use this when you have a vague idea in your head but need to show a client a polished look immediately.
Step-by-Step:
- Canvas Setup: Select “Real-time Generation”
on the dashboard. Choose your aspect ratio immediately. If this is for an Instagram Story, set it to 9:16. Do not generate square images if you need vertical; you will waste pixels cropping later. - Describe the Lighting First: Krea takes lighting cues from text very well. In the prompt box, type “Soft window light, golden hour, volumetric dust.” Do not describe the subject yet.
- Establish Geometry: Select the “Shapes” tool (or keyboard shortcut for rectangle/circle). Drop a large gray circle in the center.
- Refine the Prompt: Now add the subject. “Futuristic helmet, metallic texture, glowing visor.”
- Watch the Morph: The gray circle will instantly texture itself into a helmet.
- Paint not Draw: Switch to the brush tool. Pick a color that represents light, not pigment. If you want a blue glow, paint a rough blue streak on the visor. You will see the AI interpret that paint stroke as a reflection or an LED light source.
- Iterate: If the helmet looks too cartoonish, go to the style presets (often located near the prompt bar) and select “Cinematic” or “Photorealistic.”
- Lock and Upscale: Once you have a composition you like, hit “Quick Enhance” or “Send to Enhancer.” Never present the raw real-time screenshot to a client. It is too soft.
2. Using “AI Patterns” for Stealth Branding
This is arguably the most viral use case, but it has genuine commercial value for poster design and splash screens.
Step-by-Step:
- Prepare Your Asset: Take your client’s logo. Open it in Photoshop/Illustrator. Make it solid black on a solid white background. Save it as a PNG.
- Upload to Patterns: In Krea, navigate to the “Patterns” or “Logo Illusions” tool. Upload your PNG.
- Positioning: Scale the logo to fill about 30-40% of the frame. If it touches the edges, the effect often breaks.
- The Prompt Matters: You need organic textures for this to work. Prompts like “Spaghetti,” “Smoke,” “Clouds,” “Mountain ranges,” or “Tropical islands” work best. Geometric prompts (like “Brick wall”) often fight with the logo’s geometry.
- Fine-Tuning Strength:
- Start with the “Pattern Strength” slider at 1.0 (Max). The image will look exactly like the logo.
- Slowly drag it down to roughly 0.6 or 0.7.
- Stop when the logo disappears when you look directly at it, but reappears when you look away or blur your eyes.
- Commercial Use: Sell this as a “teaser” image for a brand launch. It forces audience interaction.
3. The “Video Restyle” Workflow
Krea allows you to upload a video and “skin” it with a new aesthetic. This is dangerous ground—it can look very “AI jittery” if done wrong.
Step-by-Step:
- Source Footage: Use a clip with high contrast and clear movement. A dancer against a white wall works great. A shaky handheld shot of a crowd will fail.
- Duration: Trim your clip to 5 seconds before uploading. Do not try to process a 30-second file; it will likely time out or fail.
- Keyframing Styles: Krea allows you to set a style for the beginning and end.
- Prompt: “Marble statue, greek sculpture.”
- Motion Consistency: There is often a slider for “Temporal Consistency” or “Motion Fluidity.” Crank this up. You want the AI to remember what the previous frame looked like.
- The “Flicker” Fix: AI video flickers. It just does. To fix this professionally, bring the Krea export into After Effects. Overlay it on top of your original footage. Set the Krea layer to “Overlay” or “Soft Light” opacity mode at 50%. This grounds the AI madness in the reality of the original footage, reducing the strobe effect.
Integrating Krea into the Adobe Ecosystem
You likely live in Photoshop or Premiere. Krea is not a replacement; it is a plugin (metaphorically).
The Photoshop Hand-Off:
- Do not try to compose typography in Krea. It is bad at it.
- Generate your background visuals in Krea.
- Upscale them.
- Bring them into Photoshop for the final composite with text and UI elements.
- Pro Tip: Use Krea’s “Remove Background” tool (if available in your version) or use Photoshop’s “Select Subject” to isolate elements generated in Krea for compositing.
The Premiere/Resolve Loop:
- Use Krea to generate “Texture layers.”
- Prompt: “Film grain, dust particles, light leak overlay, black background.”
- Generate 5 seconds of this.
- Bring that clip into your video editor, set blend mode to “Screen.”
- You now have custom, AI-generated film overlays that are unique to your project, rather than the same stock packs everyone else uses.
Subscription Value Analysis for 2025
Is the Pro plan worth the money?
Free Tier:
- Good for: Tinkering, learning the interface.
- Bad for: Work. You will hit daily limits effectively immediately if you are iterating seriously. The “fast” generation slots run out, and you are left waiting in a queue. In a professional environment, waiting 3 minutes for a render is unacceptable.
Pro Tier:
- Speed: You get priority access to the GPUs. Real-time actually feels real-time.
- Privacy: This is critical. On the free tier, your generations are often public or used to train the model (check current TOS). If you are working on an NDA project for a major brand, you cannot use the free tier. You need the privacy controls of the paid tiers.
- Commercial Rights: Generally, paid tiers grant clearer commercial ownership of the assets. Always verify the latest Terms of Service, but for paid client work, you want the paper trail of a paid subscription.
Verdict: If you bill more than $50/hour, the subscription pays for itself in one hour of saved time. Buy it.
Final Mentorship Note
Tools like Krea AI are filters. They filter out the creatives who are stuck in the past from those who are curious about the future.
The “AI will replace us” narrative is boring and unproductive. AI replaces the boring parts of the job. It replaces the endless searching for stock assets. It replaces the tedious retouching of bad textures.
Krea gives you that time back. The question is: what are you going to do with that time?
Are you going to make better work? Are you going to think bigger? Or are you just going to produce more mediocrity, faster?
The tool is neutral. The intent is yours. Master Krea, and you master speed. Master speed, and you buy yourself the time to be truly creative.
Now go create something.


")
")


? The 100% honest review...")


")