
In the past, “upscaling” was a dirty word in professional circles. Bicubic resampling in Photoshop gave us mushy, soft messes that looked like watercolor paintings gone wrong. You couldn’t invent detail that wasn’t there.
That rule is dead.
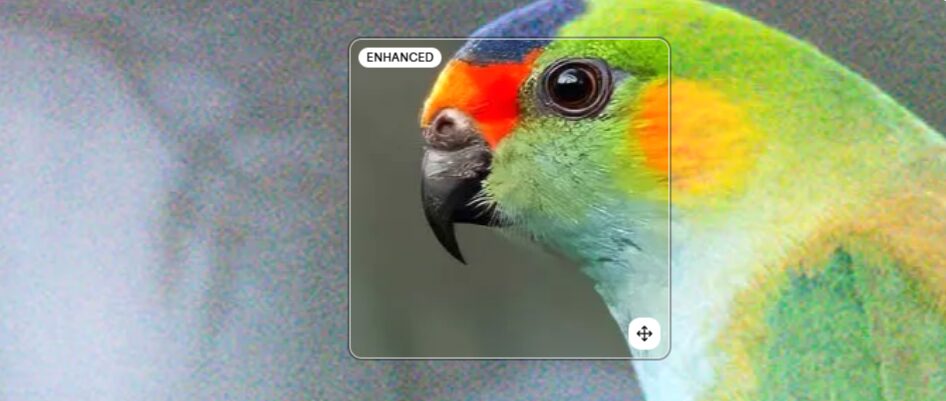
Technological advancements in machine learning—specifically the generative adversarial networks (GANs) and diffusion models used by Topaz Labs—have changed the physics of digital imaging. We can now add resolution while recovering (or even creating) texture, sharpness, and fidelity.
This isn’t about “fixing it in post” for lazy shooters. It’s about maximizing the value of your assets and dealing with the fact that a lot of AI assets are still delivered at fairly low res.
Gigapixel vs. Photo AI: Which Tool For Which Job?
Topaz Labs currently confuses the market with two flagship products that seem to do the same thing: Topaz Photo AI and Topaz Gigapixel.
You cannot afford to be confused. They are different tools for different stages of the pipeline.
Topaz Photo AI: The Generalist
Think of Photo AI as your triage center. It combines noise reduction (DeNoise AI), sharpening (Sharpen AI), and upscaling into a single autopilot interface.
- Use it for: Initial RAW processing, cleaning up high-ISO noise, and sharpening soft focus on standard-resolution images.
- The limit: varying results on extreme upscaling (400% +). It is designed to clean up an image, not necessarily to reinvent it at massive scales.
Topaz Gigapixel: The Specialist
Gigapixel is the heavy lifter. It does one thing: it increases resolution. It is built with specialized models—including the new Generative models—that Photo AI does not always prioritize.
- Use it for: Deep crops, large format printing preparation, and upscaling AI-generated content (Midjourney/DALL-E).
- The advantage: It offers granular control over “hallucinations” (computer-generated artifacts) and texture matching that Photo AI’s autopilot often glosses over.
The Pro Move: If you have a noisy, low-res image, don’t just dump it into Gigapixel. Clean it in Photo AI first (Denoise/Sharpen), export a clean TIFF, and then run that clean file through Gigapixel for the final upscale.
![]()
Mastering the AI Models (The Secret Sauce)
The biggest mistake novices make is leaving the software on “Auto” and hoping for the best. To get professional results, you must match the model to the source material. Gigapixel 8 introduced generative models that change the game entirely.
The Generative Models
These use diffusion technology—similar to how Midjourney works—to hallucinate plausible detail based on context.
- Redefine Model: This is risky but powerful. It doesn’t just sharpen edges; it generates new texture. Use this for AI art or low-res assets where the texture is completely missing. If you upscale a smooth digital illustration, Redefine can add realistic brush strokes or skin pores. Warning: It can alter the character of a face or the text on a sign. Use with caution.
- Recovery Model: This is the savior for vintage photography. If you have an old scan where the film grain has turned into JPEG compression blocks, the Recovery model breaks down the artifacts and rebuilds the image structure. It honors the original intent more than Redefine but digs deeper than the standard models.
The Classic Models
don’t ignore the legacy models. For pure photography where truth is paramount (e.g., photojournalism, architectural work), you want these:
- Low Resolution: The aggressive problem solver. Use this for images pulled from the web or heavy crops.
- High Fidelity V2: The purist’s choice. If your original image is already sharp and high-quality (e.g., a 24MP file you want to print at 60 inches), use this. It keeps the grain structure intact and avoids that “plastic” AI look.
- Lines: Essential for graphic designers. If you are upscaling a logo, typography, or vector-style art, this model ignores texture and focuses on razor-sharp geometric edges.
Face Recovery Gen 2: Realistic vs. Creative
Nothing destroys a portrait faster than bad AI upscaling. We’ve all seen it: the creepy, smooth skin; the eyes that look pasted on; the teeth that merge into a single white bar.
Topaz’s Face Recovery Gen 2 is the fix, but you have to dial it in.
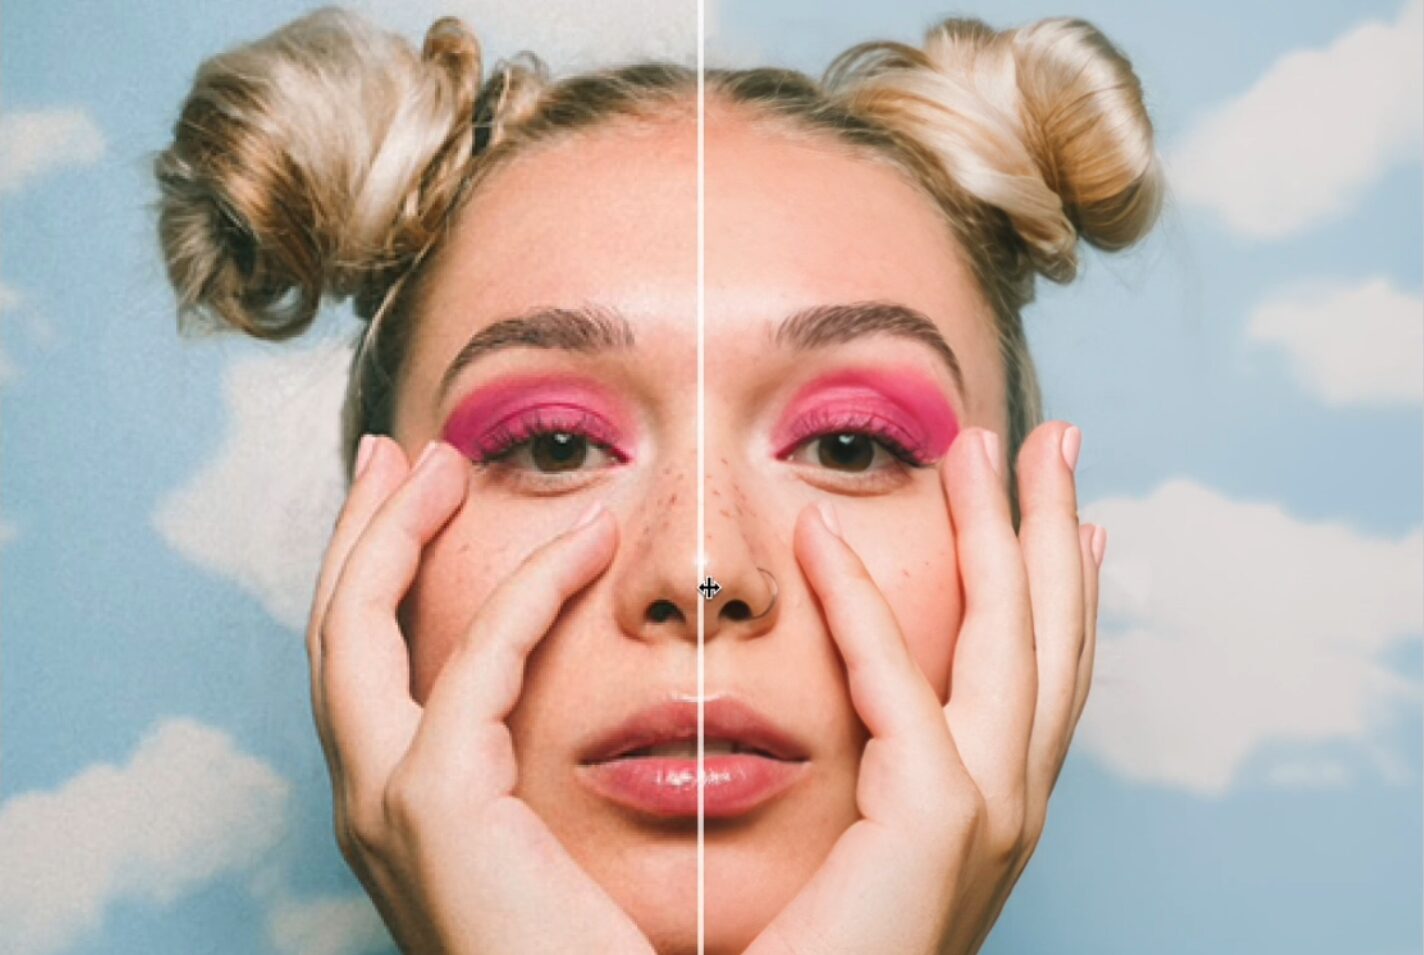
Realistic Mode
Default to this. It attempts to recover the face exactly as it appears. It sharpens the eyes and separates the eyelashes without changing the bone structure. Use this for client portraits, family photos, and anything where identity verification is key.
Creative Mode
This mode takes liberties. It will look at a blurry blob and say, “this looks like a human eye,” and generate a perfect high-res eye.
- The Risk: It might not be your subject’s eye.
- The Use Case: Background crowds, stock photography models, or artistic composites where the specific identity matters less than the overall visual fidelity.
Key Setting: lowering the Face Recovery Strength. rarely do you need this at 100%. Dial it back to 40-60% to blend the sharpened face with the natural grain of the rest of the photo. If the face is razor sharp and the neck is noisy, your edit is a failure.
The Professional Workflow
Do not treat this software as a magic wand you wave at the end of the process. It must be integrated into your pipeline.
1. Integration with Adobe Lightroom Classic
This is where most photographers live.
- Edit First: Do your color correction, exposure, and tone mapping on the RAW file first.
- The Handoff: Right-click > Edit In > Topaz Gigapixel AI.
- Format Matters: Lightroom will ask to create a copy. choose TIFF, 16-bit, ProPhoto RGB. Do not send a JPEG. You need the 16-bit color depth to prevent banding when the AI stretches the histogram during processing.
- The Return: When you hit “Save” in Topaz, it writes back to that TIFF and stacks it next to your RAW.
2. The Photoshop Plugin Method
If you are doing composite work, use Topaz as a filter.
- Layer Prep: Duplicate your target layer. Do not apply it to a Smart Object if you want to use the crop tool inside Gigapixel (which you often should to save processing time).
- Masking: The AI will sometimes over-sharpen background bokeh, making it look crunchy (the “worms” artifact). Apply the upscale on a duplicate layer in Photoshop, then use a layer mask to paint the effect out of the out-of-focus areas. Keep the sharp subject, keep the creamy bokeh.
3. Batch Processing
For wedding photographers or event shooters, time is money. Gigapixel’s standalone app handles batching better than the plugins.
- Drag 500 photos into the window.
- Select one “reference” image.
- Dial in your settings (e.g., standard model, 2x scale, face recovery on).
- Apply to All.
- Go get coffee. Let the GPU (Graphics Processing Unit) do the work.
![]()
Real-World Use Cases
Here is where the rubber meets the road.
Large Format Printing from Crop Sensors
You shoot Micro Four Thirds or APS-C. You have a client who wants a 40×60 inch print.
- The math: 40 inches x 300 PPI = 12,000 pixels wide. Your camera shoots 4,000 pixels wide.
- The fix: Set Gigapixel to “Width” output and type in 12,000px. Use the High Fidelity model to retain the sensor grain. This ensures the print looks photographic, not digital, when viewed up close.
Rescuing the “Deep Crop”
Sports and wildlife photographers know this pain. The action happened at the other end of the field. You crop in, and you’re left with 3 megapixels.
- The fix: Use Low Resolution model. It assumes the input data is blocky and deficient. It will reconstruct the feathers on the bird or the jersey texture.
- Critical step: Add Noise back in. Gigapixel has a “Add Noise” slider. Upscaled crops often look unnaturally smooth. Adding 1-2% grain unifies the image and sells the illusion of sharpness.
Upscaling AI Generated Images
Midjourney v6 is impressive, but it outputs low-res files (usually around 1 megapixel).
- The fix: This is where the Redefine (Gen 2) model shines. Increase the “Creativity” slider slightly. It will take the “painted” look of the AI art and add micro-texture—canvas weave, paper grain, or realistic skin pores—that didn’t exist in the prompt. This transforms a digital generation into something that looks like photography.
Hardware and Performance Optimization
Upscaling is computationally expensive. It hammers your GPU.
- GPU over CPU: Ensure in your Preferences that “AI Processor” is set to your graphics card (e.g., NVIDIA RTX 4090 or Apple M-Series Neural Engine), not your CPU.
- Cloud Rendering: Topaz Gigapixel 8 introduced Cloud Rendering. If you are on a laptop with weak specs (like a MacBook Air) and need to use the heavy Redefine models, offload the task to the cloud. It costs “credits,” but it saves your machine from melting and frees you up to keep working.
- Memory Usage: If the app crashes, lower the “Allowed Memory Consumption” to Medium. Generative models eat VRAM for breakfast.
Final Thoughts
We are in a new era of image fidelity. The ability to output massive, sharp, detailed prints from modest equipment levels the playing field. It means you can shoot lighter, crop faster, and still deliver billboard-quality assets.
But remember: tools do not replace vision. Topaz Gigapixel is there to save a great shot that suffers from technical limitations. It cannot turn a bad photo into a good one.
Respect the integrity of your image. Use the realistic models when truth matters. Use the creative models when art matters. And never, ever settle for “pixelated.”
Now go make something.


")


")


")