
The creative industry is going through a massive shift. You can ignore it, or you can adapt and use it to elevate your work. Stable Diffusion is at the center of this shift, standing out as a powerful free Midjourney alternative. It isn’t a magic button that replaces your job; it is a high-leverage tool that, when masterfully controlled, allows you to iterate faster, explore concepts deeper, and execute visuals that were previously cost-prohibitive.
The professionals who thrive in the next decade will be the ones who understand how this technology—and even text-based AI tools—work and how to force them to do their bidding. This guide strips away the hype and explains the technical architecture of Stable Diffusion, the software ecosystem you need to run it, and the workflows that actually apply to a professional creative career.
What Is Stable Diffusion?
Stable Diffusion is an open-source deep learning model that generates detailed images from text descriptions (text-to-image) or modifies existing images (image-to-image). Unlike proprietary “black box” systems like Midjourney or DALL-E, Stable Diffusion’s source code and model weights are public. This allows you to run it locally on your own hardware, giving you absolute control over privacy, data usage, and the generation pipeline without paying subscription fees or adhering to restrictive content policies.
At its core, it is a Latent Diffusion Model (LDM). It does not operate in pixel space like older generative models. Instead, it operates in a compressed representation of the image known as “latent space.” This architecture allows it to run on consumer-grade GPUs with 8GB or more of VRAM, rather than requiring massive server farms.
How It Works: The Technical Breakdown
Understanding the underlying mechanism allows you to troubleshoot “bad” outputs and refine your prompts and settings with intention. A standard Stable Diffusion generation involves three primary components working in sequence: the VAE, the U-Net, and the Text Encoder.
1. The Text Encoder (CLIP)
When you type a prompt, the machine does not “read” your words. A text encoder, typically based on OpenAI’s CLIP (Contrastive Language-Image Pretraining), converts your text into numerical vectors (embeddings). These vectors represent the semantic meaning of your prompt in a way the neural network can understand. If your prompt is ambiguous, the embeddings will be too, leading to generic results.
2. The Diffusion Process (U-Net)
This is the engine. Stable Diffusion is trained to remove noise from an image. During training, the system takes a clear image and incrementally adds Gaussian noise until it is pure static (random noise). It then attempts to reverse this process—predicting the noise and subtracting it to recover the original image.
During generation, the process happens in reverse:
- The system starts with a tensor of random noise in latent space.
- The U-Net neural network inspects this noise and, guided by your text embeddings (Conditioning), predicts what part of the tensor is “noise” and subtracts it.
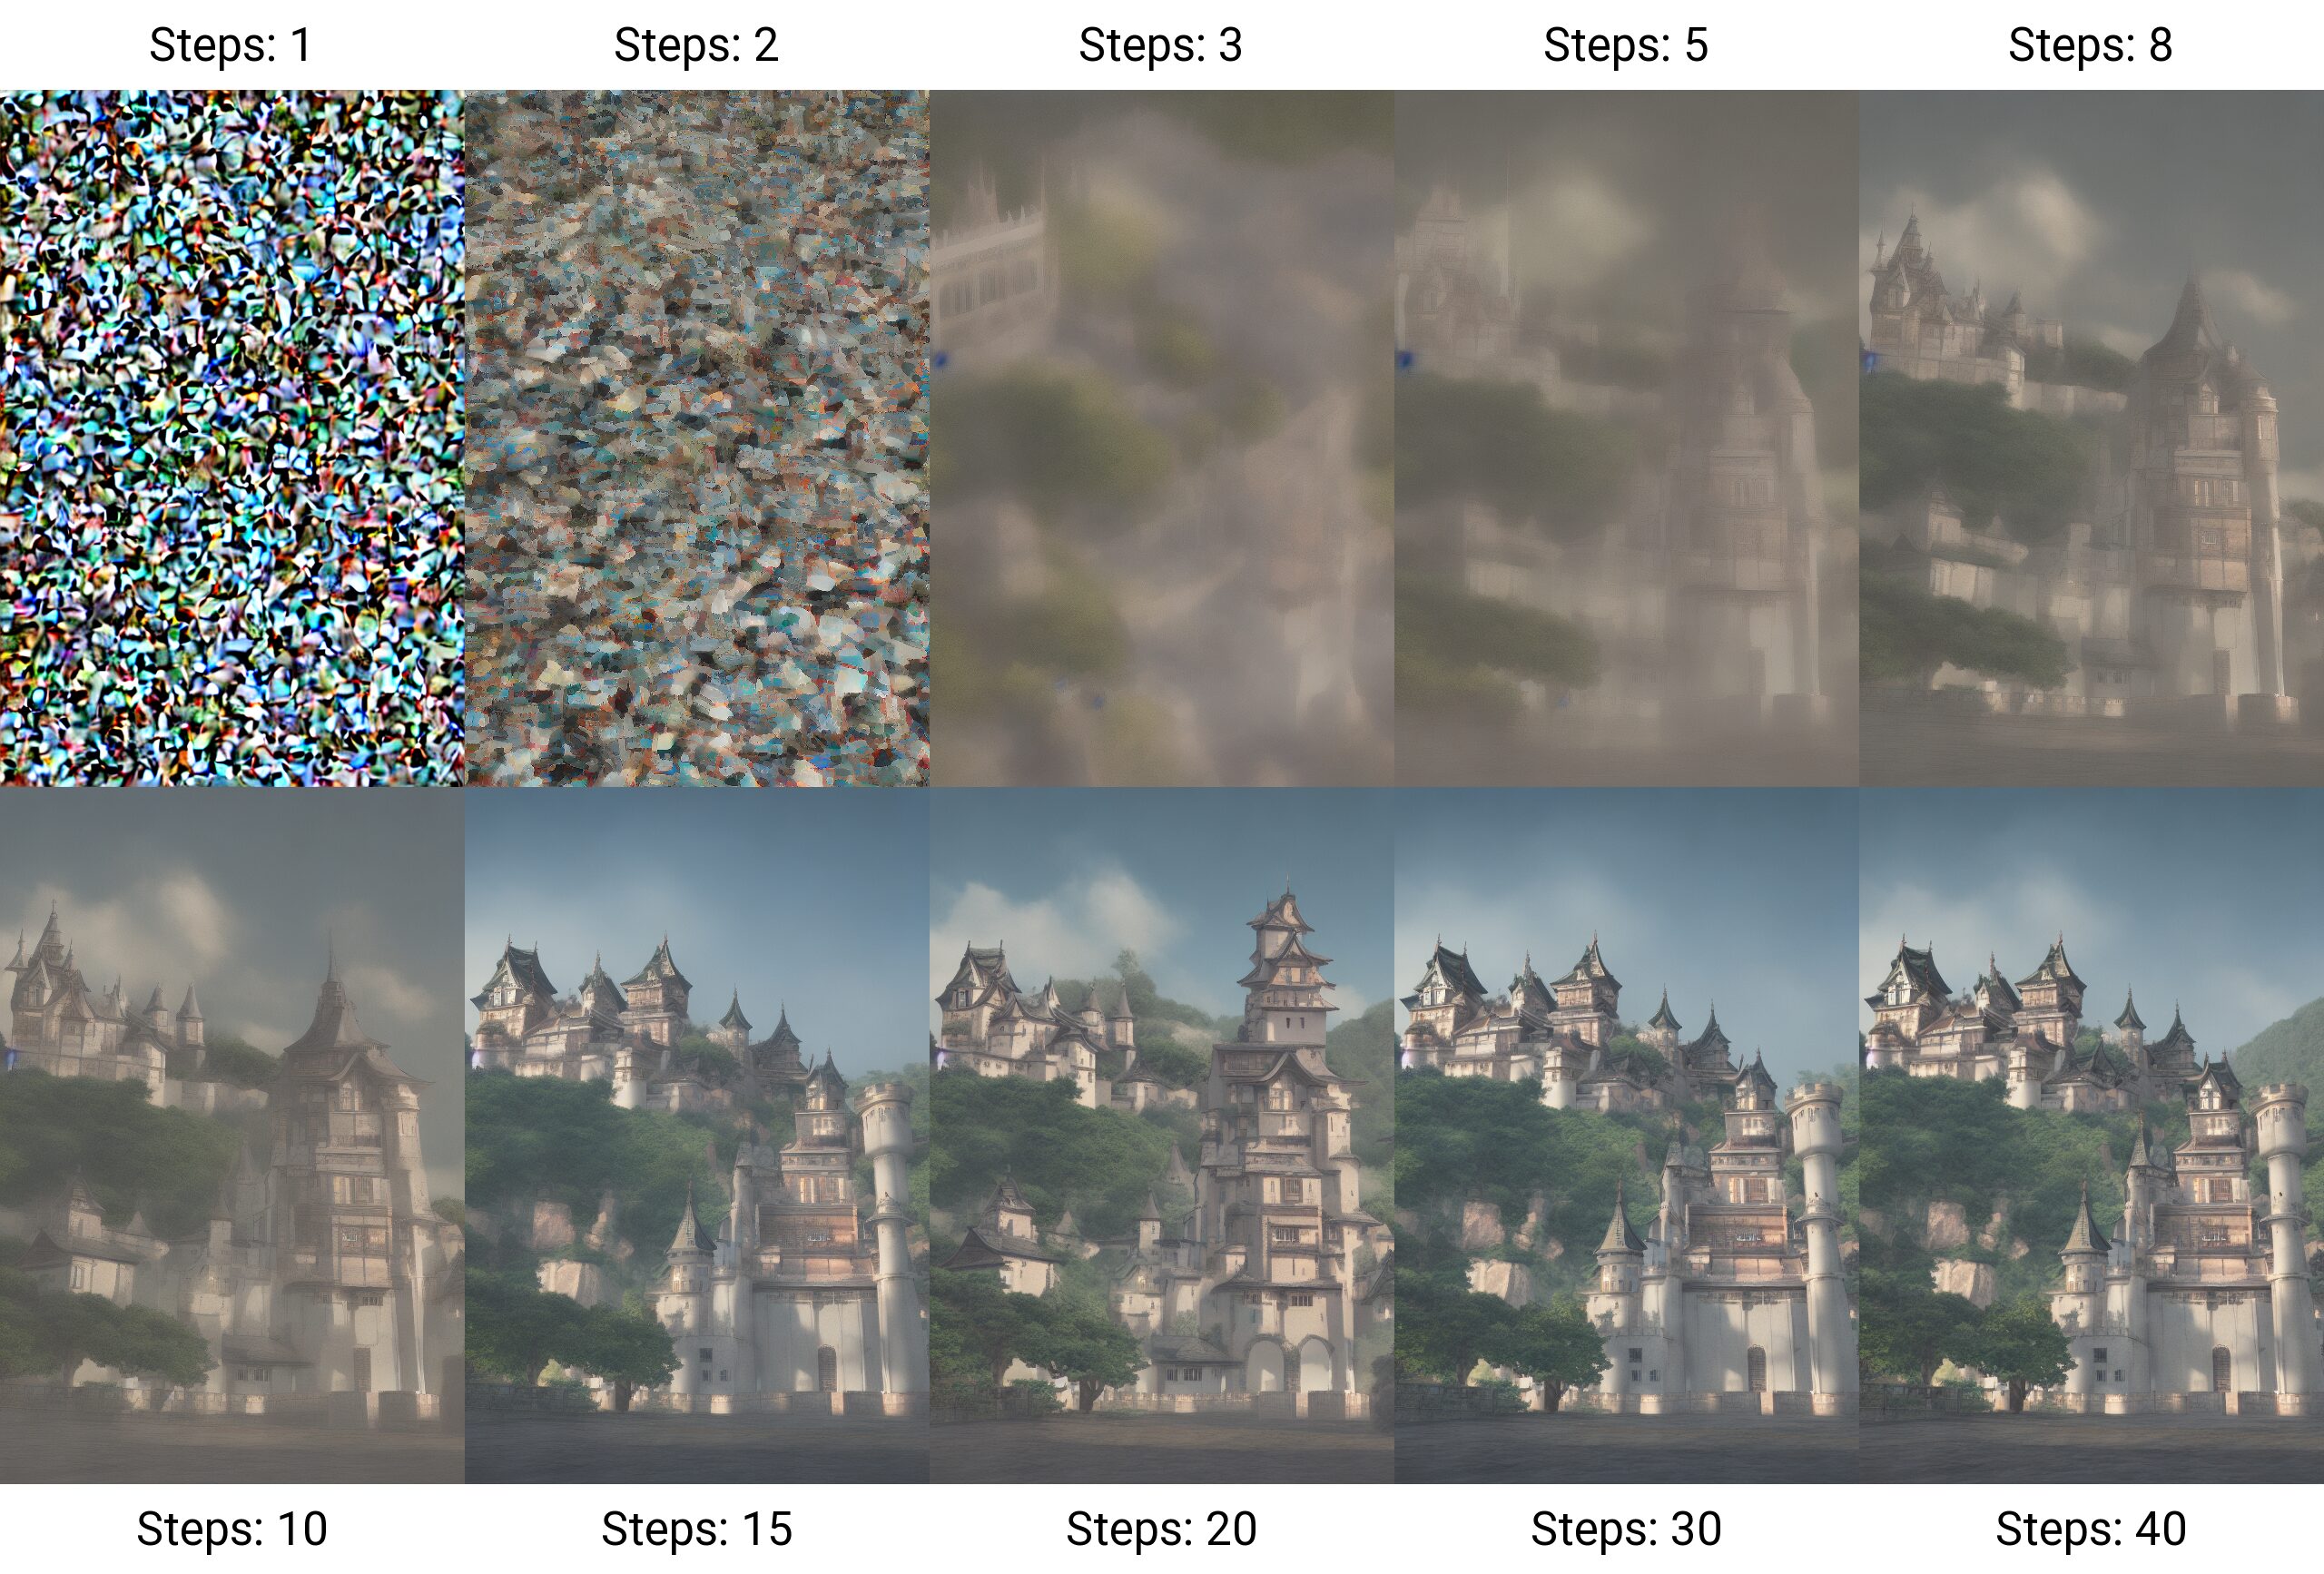
- This is repeated over a set number of “Sampling Steps.”
- With each step, the noisy latent tensor comes closer to resembling a coherent image that matches your prompt.
3. The VAE (Variational Autoencoder)
The U-Net operates in latent space—a compressed, low-resolution mathematical abstraction of the image (often 1/8th the size of the final pixels). We cannot see latent space. The VAE Decoder takes this refined latent tensor and decompresses it back into pixel space (RGB), resulting in the final perceptible image you see on your screen.
The Software You Need
You should not rely on web-based wrappers if you want professional control. You need to install an interface locally. There are two industry-standard options you should know.
Automatic1111 (WebUI)
This is the most popular, community-maintained interface. It offers a dashboard with sliders, dropdowns, and checkboxes.
- Best for: Rapid iteration, checking settings quickly, and general experimentation.
- Key Features: easy installation of extensions, intuitive “txt2img” and “img2img” tabs, and massive community support.
- Modern Alternative: Stable Diffusion WebUI Forge is a optimized fork of Automatic1111 that runs significantly faster on easier hardware. If you are starting today, install Forge.
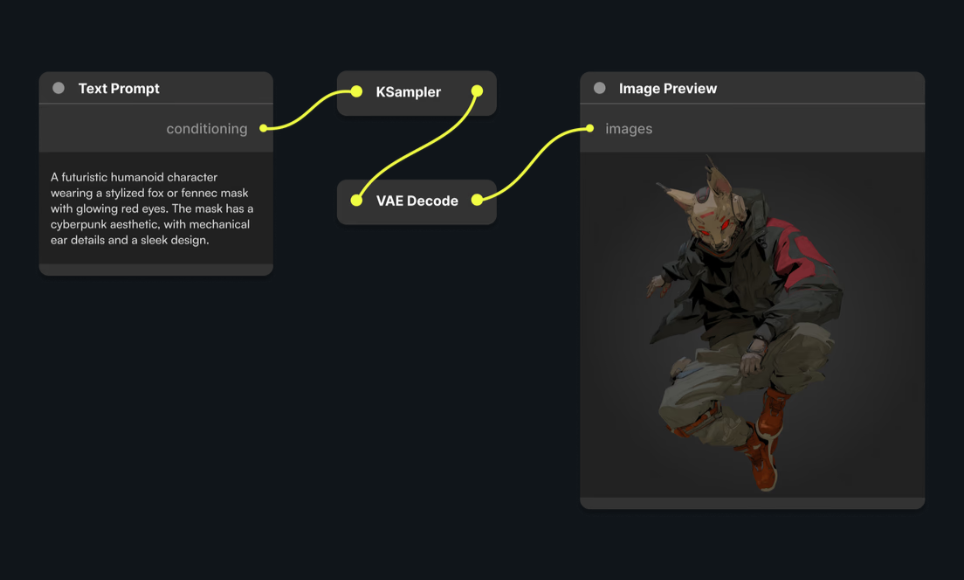
ComfyUI
ComfyUI is a node-based interface. Instead of a dashboard, you build a flowchart of nodes and wires connecting the Model to the CLIP Loader to the Sampler to the VAE.
- Best for: Building complex, repeatable production pipelines. If you need a specific workflow that generates a background, upscales it, then composites a product shot into the foreground automatically, you build it in ComfyUI.
- Key Features: Faster execution than Automatic1111, lower VRAM usage, and total transparency into the generation pipeline.
Hardware Requirements
To run these effectively, you need an NVIDIA GPU.
- Minimum: NVIDIA RTX 3060 (12GB VRAM). 8GB is passable for basic work but will bottle-neck you on higher resolutions.
- Recommended: NVIDIA RTX 4090 (24GB VRAM). This creates images in seconds and allows training your own models (LoRAs) locally.
- Mac Users: Apple Silicon (M1/M2/M3) is supported via “Draw Things” or “DiffusionBee,” but performs significantly slower than a dedicated NVIDIA PC.
Controlling the Output
Randomness is the enemy of professional work. You need consistency. Here are the tools to force Stable Diffusion to adhere to your creative direction.
ControlNet
This is the single most important extension for professionals. ControlNet allows you to use a reference image to control the structure of the generation, ignoring the colors/details of the reference but keeping the shape.
- Canny/Lineart: Extracts line drawings from your reference. You can sketch a layout on a napkin, scan it, and use ControlNet to force the AI to generate a photorealistic render that matches your sketch lines perfectly.
- Depth: Uses a depth map to understand 3D distance. Great for re-texturing a 3D block-out from Blender without losing the perspective.
- OpenPose: Detects human skeletons (limbs, head, hands). You can pose a 3D mannequin or take a photo of yourself to dictate exact body positioning in the final generation.
LoRA (Low-Rank Adaptation)
A Checkpoint (Model) is a 2GB+ file that knows “everything.” A LoRA is a small file (10MB–150MB) that knows “one specific thing.”
You can download or train a LoRA on a specific art style, a specific face, or a specific product. If you are a brand designer working with a specific recurring character or visual style, you train a LoRA on that subject. You then attach that LoRA to your generation to ensure brand consistency across thousands of images.
Inpainting and Outpainting
- Inpainting: You mask a specific area of an image (e.g., a hand or a shirt) and regenerate only that area. This is essential for fixing artifacts or changing specific details without altering the composition.
- Outpainting: You extend the canvas beyond the original borders, asking the AI to hallucinate what exists outside the frame. This is useful for resizing assets to different aspect ratios (e.g., turning a square Instagram post into a 16:9 YouTube thumbnail).
Critical Configuration Settings
Ignore the defaults. You need to understand these three settings to get usable results.
Sampling Method
The algorithm used to subtract noise.
- Euler a: Fast and diverse. Good for quick testing. The image changes completely with each step count.
- DPM++ 2M Karras: The current standard for photorealism. It converges quickly and produces sharp, clean details.
- UniPC: Extremely fast, good for low-step generations.
CFG Scale (Classifier Free Guidance)
This slider determines how strictly the AI follows your prompt versus its own training data.
- Scale 1–6: Creative, loose interpretation.
- Scale 7–9: The sweet spot. Balanced adherence to the prompt and image quality.
- Scale 12+: The image will begin to “burn”—high contrast, artifacts, and jagged edges.
Steps
How many times the U-Net denoises the image.
- 20 Steps: Usually sufficient for a preview.
- 30–50 Steps: High quality. Diminishing returns occur past 50.
Integrating AI into a Creative Workflow
Do not try to get a “final” image straight out of the prompt. That is an amateur mistake. Stable Diffusion is a raw material generator.
The Hybrid Workflow:
- Block-out: Create a rough composition in Photoshop or a 3D block-out in Blender.
- Img2Img + ControlNet: Feed that block-out into Stable Diffusion using ControlNet Depth or Canny. Prompt for the textures, lighting, and mood you want.
- Generation: Generate 20–50 variations.
- Bash & Composite: Take the best parts of 3–4 variations. Bring them back into Photoshop. Mask together the best lighting from one and the best texture from another.
- Inpaint: Use Stable Diffusion inside Photoshop (via plugins) to fix seams or edges.
- Upscale: Use an “Ultimate SD Upscale” script or a dedicated AI image upscaler to increase resolution to 4k or 8k, adding details to the pixels that weren’t there before.
A Note on Copyright and Ethics
The legal landscape regarding AI is unsettled. Currently, in the US, raw AI generations cannot be copyrighted. However, work that involves significant human input—compositing, over-painting, and editing—may be protected. Transparency is your best policy with clients. Clarify if and how AI is used in your pipeline. Use it to visualize concepts, create mood boards, or generate assets that you heavily modify.
Conclusion
Stable Diffusion is a technical discipline. It rewards study, experimentation, and precision. It is not about typing “cool picture” and hoping for the best. It is about building a pipeline that gives you leverage.
Download the software. Break the interface. Train a LoRA on your own sketches. The only wrong move is to wait on the sidelines while your competition figures it out. Get to work.


")

")


