
In the past, you had two bad options: spend five hours liquifying and puppet-warping in Photoshop until it looked “okay enough,” or schedule a reshoot. Those days are over.
We’re now at a point where we can decouple the subject from the structure. With the new Gemini 3 Nano Banana Pro model, specifically using the Weavy node interface, you can take the “soul” of one image and snap it to the “skeleton” of another.
Here is how to save your shoot (and your sanity).
![]()
The Concept: Decoupling “Subject” from “Structure”
Most people use AI tools like black boxes. They type “woman running,” and it gives them a woman running. If they don’t like it, they either give up or try again, hoping to get something good. But creative professionals need specific assets, not random generations.
The workflow I’m sharing today allows you to input two specific “Sources of Truth”:
-
The Subject Reference: The actual person, character, or product you need to feature.
-
The Pose Reference: A stock photo, a sketch, or a frame from a movie that has the exact energy you want.
If you look at the screenshot above, you’ll see the logic is surprisingly simple. We aren’t coding; we are just directing traffic.
Step 1: The Inputs
On the left, we have our two inputs.
-
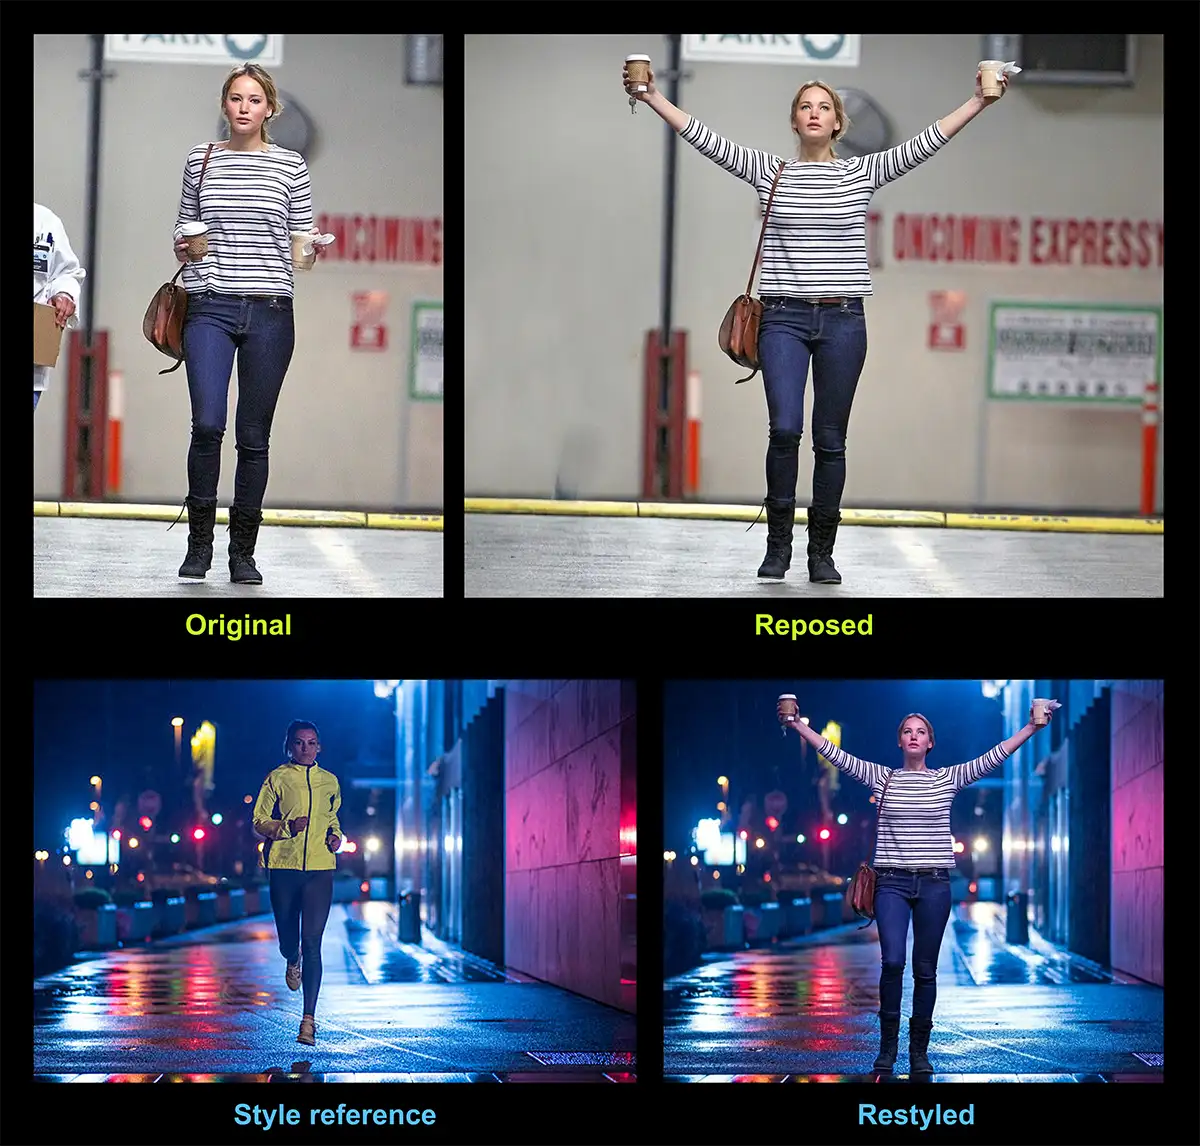
Top Node (Pose): A generic stock photo of a man celebrating on a beach. We don’t care about him, the beach, or his shorts. We only care about the geometry of his arms and legs.
-
Bottom Node (Subject): Our target subject (in this case, Jennifer Lawrence). We want her likeness, her outfit, and the lighting to remain consistent.
Step 2: The prompt
This is where Nano Banana shines. In the middle node, we give the AI a set of “architectural” instructions. We aren’t asking it to be creative; we are asking it to be obedient.
The exact prompt instructions is:
- [@]img2 is the “character reference”
- [@]img1 is the “pose reference”
- First, examine [@]img1 and extract the subject’s pose
- The objective is to transfer the subject’s pose from [@]img1 to [@]img2
- Create an image of the content as shown in [@limg2, but with the main character of [@]img2 posed in the same way as the character of [@]img1
- Keep everything else about [@]img2 the same (medium, color, saturation, etc)
- Don’t change the background or contents of [@]img2, just make the subject of [@]img2 take the same pose as the subject of [@]img1
“[@]img1 is the pose reference… [@]img2 is the character reference… Create an image of the content as shown in [img2], but with the main character posed in the same way as [img1].”
Step 3: The Execution
The output node (on the right) delivers the result. The model has taken the subject, stripped away her original walking pose, and re-rigged her body to match the celebrating man. It even attempted to adapt the coffee cups she was holding to the new hand positions.
![]()
Step 4 (optional): Style transfer
If you’ve re-posed the photo, it’s likely you’ll also want to match the look of that photo to another shot. The good news is it’s very easy to do that with Nano Banana and Weevy: just connect it to a style transfer flow (tutorial here) and you’re good- it’s like a whole new asset from a completely different shoot in less than 90 seconds.
Fine tuning the details
While this feels like magic, it’s still a tool that requires finesse. Here is how to get professional results:
-
The “Rule of Three”: Nano Banana is powerful, but it’s probabilistic. It might break a finger or twist a knee on the first try. Always run the generation 3 or 4 times. If it still fails, swap your Pose Reference for a clearer image.
-
Resolution Matters: For professional work, always toggle the resolution to 4k in the Nano Banana settings. The model supports high-fidelity output, so don’t handicap it with default web settings.
-
Beyond Photography: This doesn’t just work on photos. You can use a loose pencil sketch or a 3D block-out as your Pose Reference. This is huge for concept artists who want to turn a napkin sketch into a photoreal asset.
-
Batch It with Iterators: If you have a folder of 50 product shots that all need to be “walking,” don’t do them one by one. In Weavy, you can add an Image Iterator Node. This will loop through your entire folder, applying the pose reference to every single image automatically.
The Bottom Line
This workflow isn’t about replacing photographers. It’s about flexibility. It means you aren’t limited to the assets you captured on the day of the shoot. It gives you the freedom to adapt, remix, and save a project long after the lights have been struck.
PS – More on Weavy:


")


")
")
