

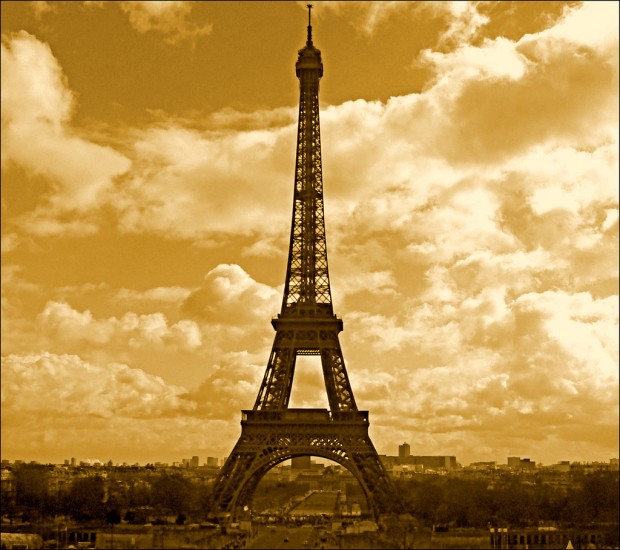
Photo by Toni Camara – A perfect example of sepia with the iconic Eiffel tower shot
Ever clicked the sepia button on Aperture, Lightroom, or your favorite photo app and wondered, “What the hell is sepia?” I bet you have. It’s fascinating how many novice and seasoned photographers alike don’t know exactly what Sepia is. So I figured I’d give you all a little bit of cocktail party ammunition to impress your friends.
In short, sepia is more than that burnt color tone filter readily available in most photo editing programs.
What is sepia in photography terms?
Put simply, sepia is a form of photographic print toning – a tone added to a black and white photograph in the darkroom to “warm” up the tones (though since it is still a monochromatic image it is still considered black and white). Sepia began in earnest in the 1880s, partially to make photographs look better, but also because the chemicals involved in Sepia aided in slowing down the aging of a photograph. A preservative of sorts.
What the hell is this toner stuff? Sepia toners are chemicals that work to convert the traditional metallic silver in the print to a sulfide-based compound, which can be applied in varying degrees of intensity depending on how “warm” the desired effect of sepia is. There are a few different compounds that can create this effect. In addition to the color shift, these sulfide compounds act as better ‘shields’ of sorts than the traditional metallic silver, and prevents environmental pollutants from damaging the print, in many cases giving the print a 50% longer life.
So, summarily, sepia has both form and function. Sure it’s a button in your fav photo editor. But at its core, it is 130 year-old creative toning process with roots as both an artistic ‘color’ statement and an enhancer of the archival qualities of a printed photo to help a printed image deteriorate more slowly.
More info for photo geeks that want to go deeper, here on wikipedia.
How to Get the Sepia Look In Your Editing App Of Choice
Now, I’m guessing most of us aren’t running a full-service chemical darkroom in our apartments. So, how do you get this classic, archival vibe on your digital images?
For those of us without access to film and a darkroom, our best bet is to create the effect in post-production. The great news is that every piece of software out there has a way to do this, from one-click filters to deeply nuanced controls.
Here’s a quick rundown of how you’d tackle it in some of the most popular tools:
- Photoshop: The pro-level move here is using Adjustment Layers. You get the most control. My go-to method is to first add a Black & White adjustment layer to get a solid monochrome image. Then, I’ll add a Photo Filter adjustment layer on top of that, select a “Sepia” or “Warming” filter, and dial in the intensity. You could also use a Gradient Map for some really custom toning.
- Lightroom: This is probably the fastest. In the Develop module, you can just go to the B&W panel and click the “Sepia” preset. For more control, I prefer using the Color Grading (or older Split Toning) panel. Desaturate your image, then add that signature warm, brownish-yellow hue into the shadows and/or midtones.
- Canva: Easy and fast. If you’re working on a design, just select your photo, go to Edit Image > Filters, and find the Sepia filter. It’s a fantastic one-click solution for adding a quick vintage feel to a design element.
- Affinity Photo: Just like Photoshop, this is all about non-destructive Adjustment Layers. You can use the Black and White adjustment and then stack a Recolour or Colour Balance adjustment on top to dial in that warm, sulphide-like tone (more on Affinity here)
- ChatGPT (DALL-E): This is a different beast entirely. You’re not really editing a photo as much as creating one or re-interpreting it. You can prompt it like, “Create an image of a 1920s street scene in a high-contrast sepia tone.” Or, if you’re using an image-editing-enabled version, you can upload your photo and say, “Apply a warm sepia tone to this image.”
- Midjourney: This works like ChatGPT or Nano Banana, but it’s purely for image generation. Try a text prompt like, “a high-contrast, sepia-toned photograph of a steam train crossing a trestle bridge, 1910s style.” You’re telling it to create a new sepia image from scratch. You can also find lots of Midjourney sepia srefs.
- Nano Banana (in Google Photos, Gemini, etc.): This is Google’s powerful AI editor. You can upload your own photo and then use a simple text prompt to edit it. You’d just say, “Apply a warm sepia tone to this image” or “make this photo look like a vintage 1890s portrait.” It’s incredibly powerful for editing existing work.
The Real Secret? Know Why.
Here’s the thing: you can always just click the “sepia” button. But the more you understand what’s happening in an actual, chemical sepia photograph- that feeling of the metallic silver being converted, the “warming” of the tones, the archival purpose- the better your digital versions will be.
When you know the “why,” you stop just slapping on a filter. You start thinking, “Does this image need more contrast before I tone it? Should the toning be more in the shadows or the highlights? Am I going for an 1880s vibe or a 1920s vibe?”
That’s the difference between using a preset and making a creative choice. Go get ’em.
PS – also check out: alternatives to Midjourney, Meta AI, and Squarespace


")


? The 100% honest review...")
")


Before delivering this to consumers, about 500,000 folks have apparently lost weight to the diet and currently Dr.
Do you realize that we now have numerous deficiencies in diabetics which is often cured
with products?
This post offers clear idea for the new people of
blogging, that genuinely how to do blogging and site-building.
Currently YouTube videos quality is more improved and better, so that’s the reason that I am watching this video at at this time.
I’m usually to blogging and i really admire your content. The article has actually peaks my interest. I’m going to bookmark your website and maintain checking for brand spanking new information.
WOW It’s such a shame more people don’t know about this site, it had just what I needed this morning.