 One of the most consistent requests I get from readers is for info about all the paperwork and business side of the photo & cinema industries. Given that our Executive Producer, Kate, handles all that, I’ve talked her into doing a series of posts that get down to the brass tacks. This post is about that ever-important piece of paper that few photographers obtain–or even know how to obtain the location PERMIT. So here’s Kate to give you all the important info you’ll need…
——-
Hello everybody. Kate here.
One of the most overlooked parts of making your location-based photo shoot “legit” in terms of being within the law and being “professional” is obtaining a shooting permit. A location shooting permit is a document that gives you permission (usually from local, city, or federal governments) to be shooting in public places. I know that the process can seem a little intimidating (ok, totally sucky) if you have never applied for a permit before, but once you know the basics, the process is rather easy, and is actually quite similar from agency to agency, location to location. In this post, I’ll cover when you need a permit, who to contact, how to apply, and then show a specific example.
When do you need a permit?
If you are just walking around with your camera and shooting casually, you generally don’t need a permit. You will, however, need a permit if you are shooing on public property OR if your shooting will impact others and/or the environment. The threshold varies from location to location, but generally, ask yourself these questions:
- Is this a commercial shoot?
- Will your filming disturb traffic or pedestrians?
- Will you need to use tripods, dollys, wires, a generator or other equipment on sidewalks or streets?
- Are you using the public space in a special/different way than it is intended?
If you answer yes to ANY of these questions, you likely need a permit. This is where one of two things may happen. If you have a producer or a location scout, they take over and get the job done. Location scouts, producers, and production companies can save you tons of time and will have great insider information. Alternatively, if you’re without one of those specialists–like most small productions–you’ll need to crank through this permit process yourself. (Don’t fret. You CAN do this.)
Who do I talk to? How do I get started?
Start with finding the right contact at the right agency. Try reaching out to fellow photographers in the area, producers, or production assistants. Reference the local ASMP chapters or other trade organizations. Use your network. Pickup a copy of the local “production index” (try Googling ‘production index + your city for a start…) for the city in which you’re shooting. Ultimately, the goal is to find the government agency websites who issue permits for your locations of interest. As an example, here in Seattle, it’s the Mayor’s Office of Film & Music. This is where you can track down the proper permitting forms. In most cases, this information is online and you can download the forms or at least find the right person to get the process rolling.
Applying for the permit
- Start by making contact. Call them. Let the agency know that you’ve found the forms online and that you plan to permit. Make certain that your location is covered under their jurisdiction. Ask questions. Let them know when and where you hope to shoot and find out if there are any conflicts during your proposed time. Also, ask if there is anything that you’ve overlooked about the process so that you can ensure you get the application correct the first time.
- Allow yourself enough time. Some permits can be processed quickly, within a few days, while others require up to 10 days or even more. Time is often not a luxury I have, so I always begin the process as soon as I know the city in which we will be shooting, even if that just means starting the conversation with the contact at the permitting agency.
- Read the fine print… carefully. There can be hidden information. This is an official government form and each agency can be very specific about what they need and how they need it. Don’t be intimidated, just be thorough.
- Complete the forms.
~Fill in every blank.
~Type or print legibly.
~Describe EXACTLY what you plan to shoot at the location so there is no confusion.
~Be honest.
~Provide maps/sketches if necessary or helpful.
~Triple check your dates for shooting.
~Build in time for schedule changes/weather delays if possible.
~Make it easy for someone to approve your permit. If everything is correct and accurate, all they have to do is give you your permit. And they’ll love you. - Submit your form and follow up to make sure the form is received and is being processed.
- Pay your fee and/or damage deposit.
- Get your certificate of insurance. This is a document from your insurance agent that proves that you have liability insurance (protects you if someone gets hurt, damaged, etc). This is necessary for most permits; however, I know that in Seattle specifically, small productions are not required to present insurance. If you don’t have this insurance for your company, you CAN get short term insurance for just the shoot. Call your agent.
- Fulfill any additional requirements of permit. These requirements may include: police assistance, parking passes, community notification, rules of the area, etc. The agency, their website, or the forms will help direct you to these resources.
- Make sure you receive the final signed permit. You MUST have the final permit with you at all times. THIS IS ESSENTIAL! Rangers, city officials, security guards, and police really will stop you and ask to see your permit. The bigger and more intrusive your shoot, the more likely you’ll be asked.
Tips
- If you don’t hear back, don’t assume the worst. Be proactive and follow up politely. Don’t underestimate the power of the phone call. These folks are BUSY.
- Remember that most cities see shoots coming in as an economic benefit and they want your business.
- Some cities have roving permits, which allow you to cover a much more broad area with your permit (instead of designating a specific street or streets). This may be available if you have a very small crew, aren’t disrupting traffic or pedestrians and don’t have much equipment.
- Some locations will have different permits for different size crews. If you can keep your crew small, you can keep the permit much cheaper and simpler.
- Make sure your locations have bathrooms.
- Remember that being on location is like a guest in someone’s house. Treat everyone and the location in a way that would make them want to invite you back.
- Shooting on private property? This is different. If the location is not public, just contact the owner directly for permission. You may still pay a location fee, but you will likely have a rental agreement in lieu of a permit. Don’t forget your location release!
Here’s a specific example:
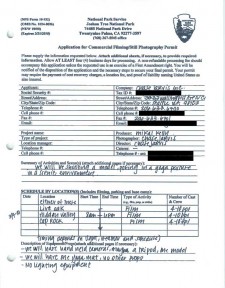
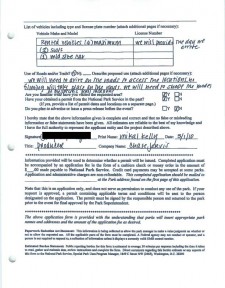
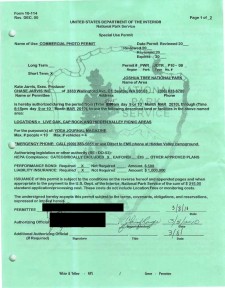
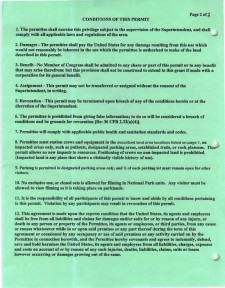
We shot part of a Lululemon campaign in Joshua Tree National Park. I thought it might be helpful to share with you the actual paperwork completed and submitted and the permit and rules that they issued.
1. First, you can see information about shooting in Joshua Tree and download various applications here.
2. We did just that. Here is our completed application:
3. Once our application was approved, we received the final permit you see here, which we then took on location the day of the shoot:
4. Here is the final ad we shot that day in Joshua Tree: Say No To Camel Toe.

And there you go… Permitting 101 to help you obtain your permits for future shoots. Please feel free to use the comments section for any questions or further considerations.
PS – Just for fun, some cool apps photographers, designers, etc should check out: Midjourney, Nano Banana, Meta AI and Affinity Studio






Very helpful! Have been looking into some of the requirements for larger video productions for Josh Bois TV and wanted to make sure I understood the important factors and resources needing to be handled!
Thanks Kate,
A potential client once asked me to shoot group shots of their students at a ballpark, a national historic site, on the art museum steps and then in a crowded indoor market, all in the same day. When I told them I would need to get permits they asked me if I couldn’t just run in real quick and grab the shots. I told them no, that I was sure that I would stopped at one or more of the locations and would not be able to fulfill the assignment. I never heard from them again and that was fine with me.